Browse the open issues and comment which you would like to work on
It is only one person per issue, except where noted.
Fork this repo
Clone the repo to your machine (do not open Xcode yet)
In the same folder that contains the SymbolGrid.xcconfig.template, run this command, in Terminal, to create a new Xcode configuration file (which properly sets up the signing information)
Checkout a new branch (from the dev branch) to work on an issue
Contributing
To start contributing, review CONTRIBUTING.md. New contributors are always welcome to support this project.
👀 Please be sure to comment on an issue you’d like to work on and Dalton Alexandre, the maintainer of this project, will assign it to you! You can only work on ONE issue at a time.
Checkout any issue labeled hacktoberfest to start contributing.
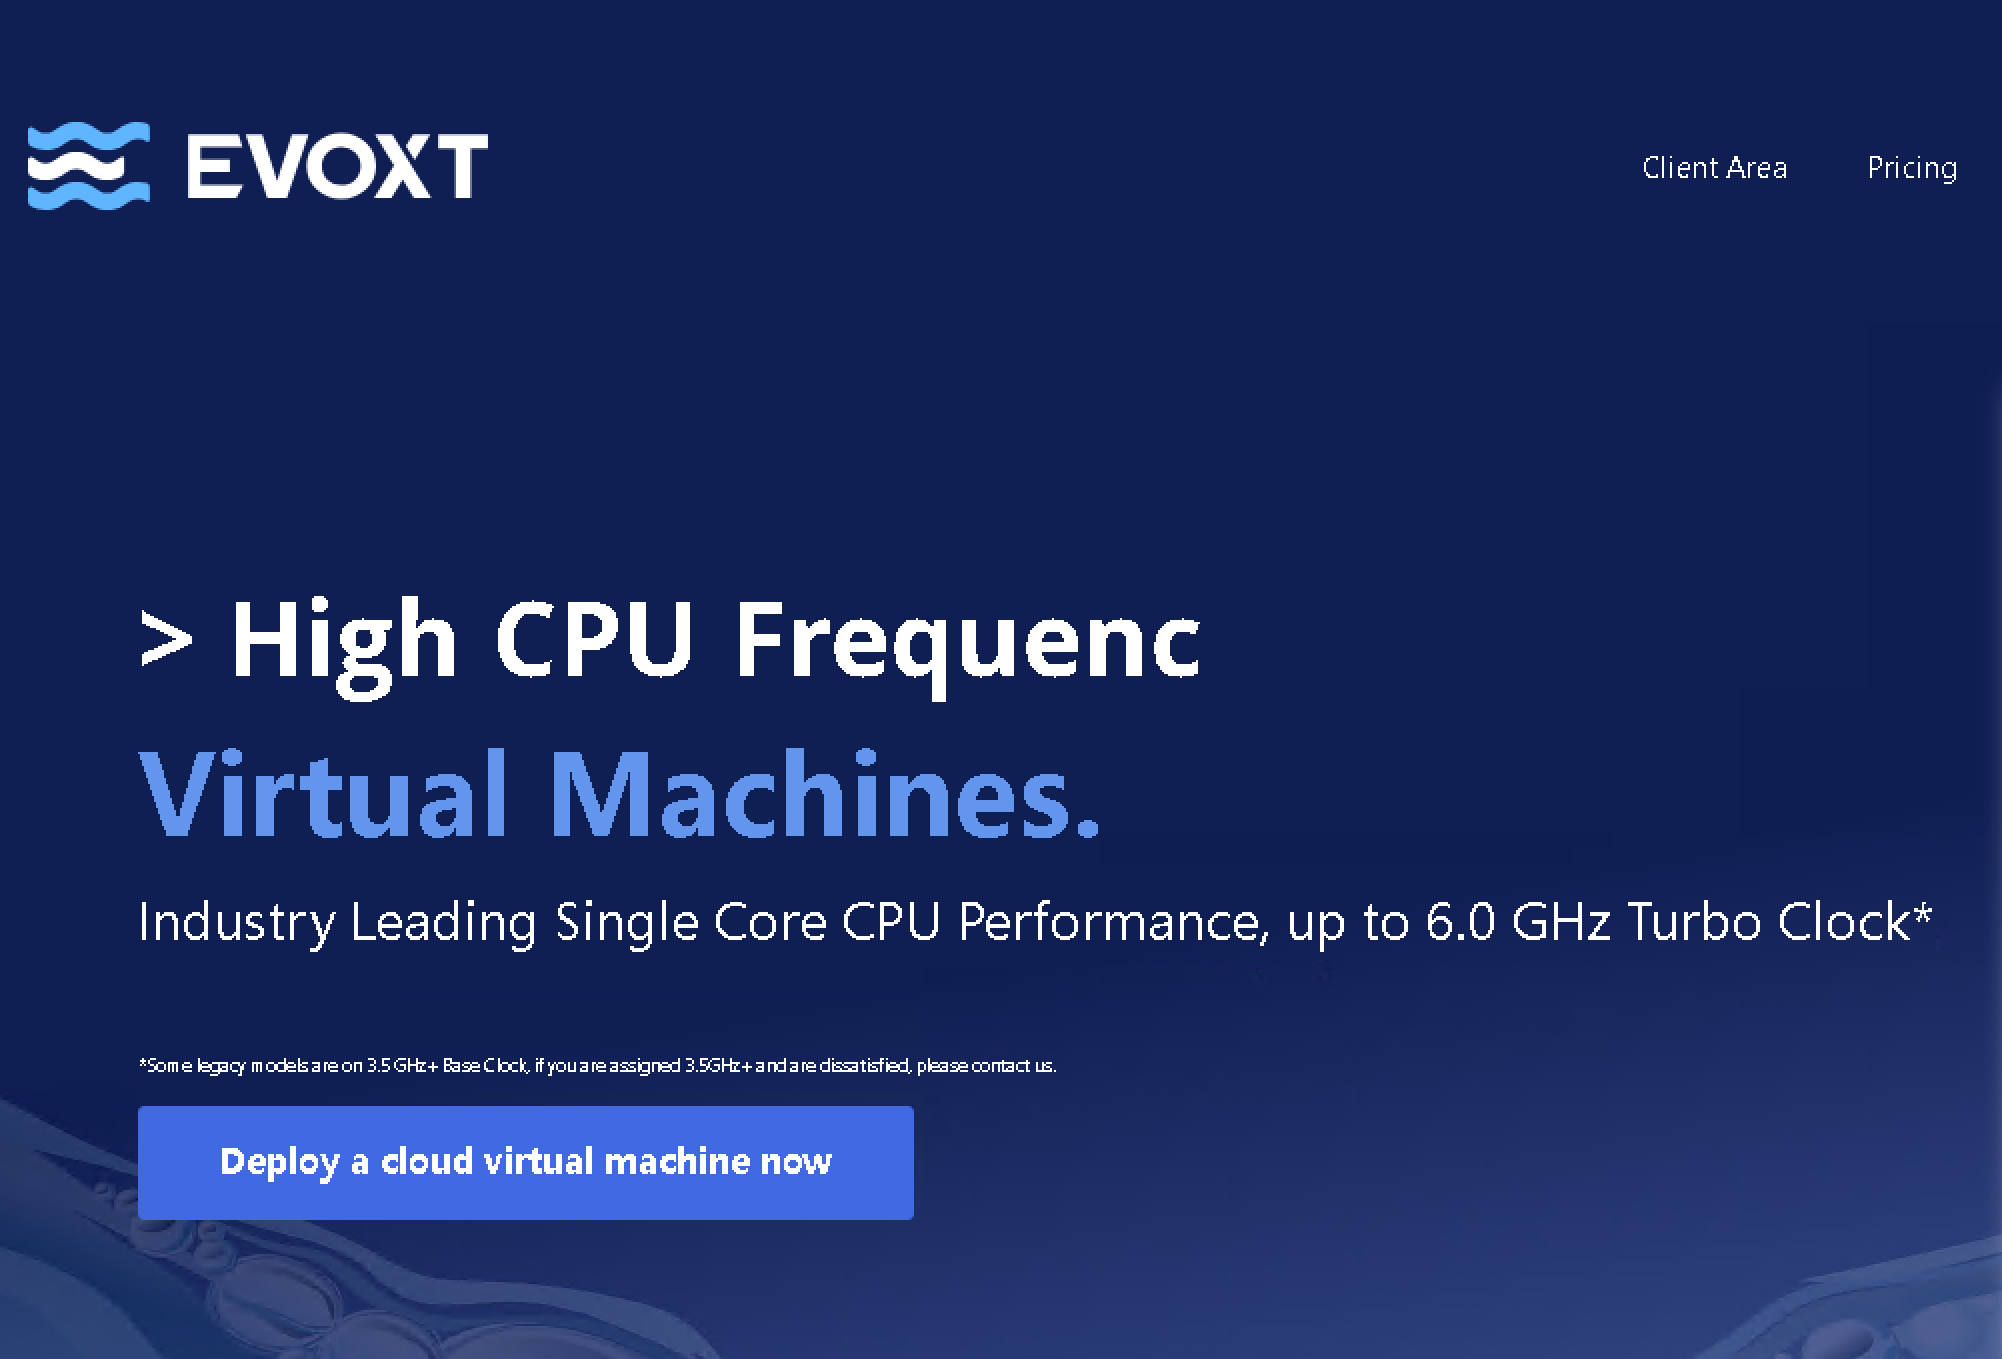
Evoxt Coupon Codes and 2024 Japan VPS Latest Deals Compilation Summary
Evoxt Introduction
Evoxt, a VPS hosting provider, recently announced the launch of its new Japan VPS plans at competitive prices. Starting at $2.99/month, these VPS packages offer 512MB RAM, 1 CPU core, 5GB SSD storage, and 250GB monthly traffic with 1Gbps bandwidth. The servers are KVM virtualized with pure NVMe SSD arrays, offering high performance and stability. The Japan data center is located in Osaka and uses SoftBank lines, providing excellent connectivity.
The following table outlines the various VPS packages available from Evoxt, detailing the memory, CPU, NVMe storage, monthly traffic, and prices. These plans support major Linux distributions, as well as Windows Server 2012, 2016 (both Chinese and English versions), and 2022.
Evoxt is known for offering affordable VPS solutions with a variety of configurations. Its new Japan VPS plans are competitively priced and use high-frequency CPUs, SSD RAID10 arrays, and 1Gbps bandwidth, making them suitable for various use cases. The Osaka data center provides excellent connectivity through SoftBank lines, ensuring reliable and stable performance. Whether you’re hosting a website or running applications, Evoxt’s plans can meet a range of needs.
Updates have been delayed due to lack of time allocated for development. Furthermore, I have no plans to make this project more functional.
If you are looking for something more versatile, I recommend markdown-oxide.
Motivation
Obsidian.md is a fantastic tool that enables you to
create your own Wiki using Markdown. It’s not only convenient but also boasts an
iOS app that makes viewing easy. However, my goal was to further enhance this
experience by allowing the use of any text editor like Neovim. The need for such
flexibility is what led me to the development of this LSP server for
Obsidian.md. It aims to make editing your Obsidian notes more efficient and
flexible, all in your editor of choice.
Features
The Obsidian.md LSP server provides the following main features:
textDocument/completion: Provides search within the Vault and
autocompletion of links, enabling efficient navigation within your wiki.
textDocument/codeAction: If the alias on WikiLink is not listed in the
alias settings in the document’s frontmatter, add the string into the alias
entry in the document’s frontmatter.
textDocument/publishDiagnostics: Detects and alerts you of broken or
empty links, ensuring the consistency and integrity of your wiki.
textDocument/definition: Allows you to jump directly to a page from
its link, aiding swift exploration within your wiki.
textDocument/hover: Displays the content of the linked article in a
hover-over preview, saving you the need to follow the link.
textDocument/rename: When Rename is performed on a document being edited,
the string of the renamed symbol is added to the alias. If the title has not
been set, it will also be set to the title of the document.
textDocument/references: (Will) display a list of all articles that
contain a link to a specific article, helping you understand the context and
relationships of your notes. This feature is currently under development.
workspace/symbol: (Will) enable searching for symbols across the
entire workspace, helping you quickly locate specific topics or keywords.
This feature is currently under development.
The Obsidian.md LSP server makes your Obsidian usage more potent and efficient.
You can edit your Obsidian Wiki in your preferred editor, maximising its
potential.
How to use?
This is not a plugin itself and does not provide each function directly to the
editor. If you still want to try it, you can access each function with the
following settings.
Visual Similarity Search Engine demo app – built with the use of PyTorch Metric Learning and Qdrant vector database.
Similarity search engine is used for comparing uploaded images with content of selected categories.
There are two modules created within the engine:
Interactive Application – used for finding the closest match of uploaded or selected image within a given data category.
Model Training/Deployment Module – used when a new data category is added to the application.
Both modules mentioned in the introduction use libraries specified in the poetry.lock file which are resolved
based on the contents of pyproject.toml file.
Installation and functioning of the modules depends on the data folder and two environment files – first for Docker-Compose build,
and second for working of Python app.
Environment variables file for Docker-Compose is .env. It contains a selection of variables:
QDRANT_PORT – port for Qdrant service,
INTERACTIVE_PORT – port for Streamlit service,
PYTHON_VERSION – used Python version,
QDRANT_VERSION – version of Qdrant’s docker image,
INTERACTIVE_APP_NAME – name of docker image’s working directory,
QDRANT_VOLUME_DIR – Qdrant container’s volume directory for Qdrant’s storage,
MODEL_VOLUME_DIR – interactive container’s volume directory for local pull of models from cloud storage,
Environment variables file for Python processing is .env-local or .env-cloud. It contains a selection of variables:
QDRANT_HOST – host for Qdrant service,
MINIO_HOST – host for MinIO S3 cloud storage,
MINIO_ACCESS_KEY – access key for MinIO S3 cloud storage,
MINIO_SECRET_KEY – secret key for MinIO S3 cloud storage,
MINIO_BUCKET_NAME – default bucket name in MinIO S3 cloud storage,
MINIO_MAIN_PATH – MinIO object path to directory containing data folder,
TYPE – environment type (options for cloud: PROD, TEST, DEV | options for local: LOCAL).
Apart from environmental variables, application uses contents of the dedicated data folder structure (available on the same level as .env file:
The structure of the data folder is split as follows:
metric_datasets – split into folders corresponding with data categories, each containing raw pictures that were used for model training and are being pulled as a result of visual search.
models – split into folders corresponding with data categories, each containing pretrained deep learning models,
qdrant_storage – storage for vector search engine (Qdrant), each data category has its own collection.
logos.zip – metadata, models and image repository.
shoes.zip – metadata, models and image repository.
waste.zip – metadata, models and image repository.
Unpack selected datasets to the cloned repository so that the folder structure from previous section is retained.
In the metrics/consts.py in the definition of MetricCollections class comment dataset names that were not added:
classMetricCollections(Enum):
""" Enum of available collections and pretrained models for similarity. """DOGS="dogs"SHOES="shoes"CELEBRITIES="celebrities"LOGOS="logos"WASTE="waste"
Install Python version 3.10 and pip, pipenv libraries.
# If Poetry env set as default Python env.
streamlit run interactive/search_app.py --server.port=$INTERACTIVE_PORT --server.address=0.0.0.0

# Otherwise.
poetry run python -m streamlit run interactive/search_app.py --server.port=$INTERACTIVE_PORT --server.address=0.0.0.0
Access the visual similarity search engine under URL: localhost.
Local – Docker
Installation using the terminal window:
Install git, docker, docker-compose and make packages.
logos.zip – metadata, models and image repository.
shoes.zip – metadata, models and image repository.
waste.zip – metadata, models and image repository.
Unpack selected datasets to the cloned repository so that the folder structure from previous section is retained.
In the metrics/consts.py in the definition of MetricCollections class comment dataset names that were not added:
classMetricCollections(Enum):
""" Enum of available collections and pretrained models for similarity. """DOGS="dogs"SHOES="shoes"CELEBRITIES="celebrities"LOGOS="logos"WASTE="waste"
To set up a dockerized application, execute one of the options below in the terminal window.
# Use Makefile:
make run-local-build

# Optional:
make run-local-build-qdrant-restart
make run-local-build-interactive-restart
Access the visual similarity search engine under URL: localhost.
Cloud – Docker
Installation using the terminal window:
Install git, docker, docker-compose and make packages.
Create .env-cloud file by copying and renaming the .env-local file.
Fill parameters of .env-cloud file with specific values:
QDRANT_HOST=qdrant-cloud,
MINIO_HOST, MINIO_ACCESS_KEY, MINIO_SECRET_KEY, MINIO_BUCKET_NAME with MinIO-specific data,
MINIO_MAIN_PATH with path to directory containing data folder on MinIO’s MINIO_BUCKET_NAME,
TYPE=DEV is preferred over TEST and PROD (option LOCAL does not work with cloud).
To install new environment execute one of the options below.
# Use Makefile - run one at the time:
make run-cloud-build

# Verify if run-cloud-build ended using logs in interactive-cloud container. Then, run the following two.
make run-cloud-build-qdrant-restart
make run-cloud-build-interactive-restart
Access the visual similarity search engine under URL: localhost.
Accessing MinIO
Current implementation allows you to access category-related datasets from the level of MinIO cloud storage.
All communication between a storage and an application/Docker is performed via the MinIO Python client.
For secret and access keys contact the MinIO service’s administrator or create a service account
for your bucket. This may be performed from the level of MinIO Console.
A need for building other connectors may arise – for now only manual fix could be applied:
Replace the client’s definition and adjust functions for getting/listing objects.
Docker Compose Structure
There are two compose files, each responsible for setting up a different way of data provisioning to the final
application:
docker-compose-local.yaml – After the data folder is manually pulled by the user, compose file creates two services: qdrant-local and interactive-local, which share appropriate parts of the data folder as their respective volumes.
docker-compose-cloud.yaml – The data folder is available on the MinIO cloud storage with access via the Python client. Only Qdrant-related and Model-related data is pulled locally for the services to run properly. Compose file creates two services: qdrant-cloud and interactive-cloud which share model_volume and qdrant_volume volumes.
Those files share Qdrant and Python versions, .env file inputs, Dockerfile-interactive file and docker-entrypoint-interactive.sh script.
Datasets
Both Model Training and Application modules use the same scope of datasets.
Each category corresponds with a single dataset.
Models are trained separately for each category.
Application returns search results from the scope of images available only within the selected data category.
All datasets listed below are the property of their respective owners and are used .
Current Datasets
List of datasets with trained models that are available in the Visual Similrity Search application:
A large dataset containing images of list of the most popular 100,000 actors as listed on the IMDb website (in 2015) together with information about their profiles date of birth, name, gender.
Since multiple people were present in original pictures, many of the cropped images have wrong labels. This issue was mostly resolved by selecting images of size +30kB.
Only pictures available in RGB mode were selected.
The largest logo detection dataset with full annotation, which has 3,000 logo categories, about 200,000 manually annotated logo objects and 158,652 images.
A large household waste dataset with 15,150 images from 12 different classes of household garbage; paper, cardboard, biological, metal, plastic, green-glass, brown-glass, white-glass, clothes, shoes, batteries, and trash.
Queued Datasets
List of datasets that are queued for implementation:
Thr growing e-commerce industry presents us with a large dataset waiting to be scraped and researched upon. In addition to professionally shot high resolution product images, we also have multiple label attributes describing the product which was manually entered while cataloging.
Application
The public version of the Cloud-based application is available here: Visual Similarity Search App.
Frontend is written in Streamlit and uses dedicated assets, local/cloud image storage,
pre-built models and Qdrant embeddings. The main page is split into 4 main sections:
Input Options – Initial category selection via buttons and option for resetting all inputs on the page.
Business Usage – Dataset description and potential use cases.
Image Provisioning Options – Chooses a way of selecting an input image.
Input Image – Shows a selected image.
Search Options – Allows a selection of a similarity benchmark and a number of shown images. After the search, you can reset the result with a dedicated button. Images that are the most similar to the input image appear in this section.
Credits – General information about repository.
A given section is visible only when all inputs in previous sections were filled.
Add or Update Data
A new dataset can be added to the existing list of options by:
Preprocessing the new/updated dataset and adding it to the data folder.
Adding embeddings to the new collection in the Qdrant database.
Updating constants in the code.
Model Training Module
Model training module utilizes a concept of Mertic/Distance learning. Metric/Distance Learning aims to learn data
embeddings/feature vectors in a way that the distance in the embedded space preserves the objects’
similarity – similar objects get close and dissimilar objects get far away. To train the model we use
the Pytorch Metric Learning package which consists of
9 modules compatible with PyTorch models.
The target of a model training module is to translate images into vectors in the embedding space.
Model training can be performed after following preparation steps has been completed:
Contents of the dataset_name dataset has been added to the data/metric_datasets/dataset_name directory.
A meta_dataset_name.csv metadata file has been prepared (normally stored under data/qdrant_storage directory. This file contains information on the contents of the dataset_name dataset split by columns:
“ – first, empty name column, contains index number.
file – required – name of the file.
class – required – name of the class a given image is a part of.
label – required – an integer representing the class.
additional_col_name – not required – additional column with information used for captioning images in the final application. There may be multiple columns like that one added.
Optional training parameters (added in terminal command):
data_dir – Path for data dir.
meta – Path for meta file of dataset.
name – Name of training, used to create logs, models directories.
trunk_model – Name of pretrained model from torchvision.
embedder_layers – Layer vector.
split – Train/test split factor.
batch_size – Batch size for training.
epochs – Number of epochs in training.
lr – Default learning rate.
weight_decay – Weight decay for learning rate.
sampler_m – Number of samples per class.
input_size – Input size (width and height) used for resizing.
To run the training module run the following command in the terminal (adjust based on above list of parameters).
Copy trunk.pth and embedder.pth files to the data/models/dataset_name folder.
Training Results
When a model training is finalized, a folder containing training results for this experiment is created.
Part of these results showcase model performance and information regarding metrics and their evolution in
time. To interpret these results better, this data can be ingested by Tensorboard, providing user with necessary dashboards.
Metric logs generated during the training period can be uploaded to the Tensorboard-dev,
which is a server-based repository of experimental results, using following command.
tensorboard dev upload --logdir metric_dataset_name/training_logs \
    --name "dataset_name training experiments" \
    --description "Metrics for training experiments on dataset_name dataset."
This command outputs a link to the dashboard containing metric charts divided by experiments.
Once the model is trained, a corresponding embeddings collection has to be uploaded to the Qdrant database.
It can be performed by completing the following steps:
Modify MetricCollections class with a new entry for dataset_name.
Add relevant reference in the CATEGORY_DESCR parameter.
Copy notebook notebooks/demo-qdrant.ipynb to the main visual-similarity-search directory and run it in Jupyter.
Run docker container containing Qdrant database.
Run commands for (re)creating and upserting dataset_name embeddings to the new collection – collection name has to be the same as dataset_name.
Optionally collections that are not used can be deleted from the Qdrant database.
If the Qdrant database is not based on the volume, after recreating Docker container the database will not retain inputted entries.
Using Jupyter Notebooks
Jupyter notebooks serve as a support during the development:
demo-api.ipynb – used for testing functions used by the application module.
demo-data-upload.ipynb – used for uploading new datasets and related models to the MinIO storage.
demo-minio.ipynb – used for testing functions of S3 MinIO data storage.
demo-qdrant.ipynb – used for adding vector collections to the Qdrant storage.
Installation Dependencies and Other Issues
For installation on Windows, install wsl, modify Docker and follow instructions for Linux.
Installation dependencies are resolved and then defined by poetry. If some dependencies cannot be resolved automatically, down-/up-grading a version of the problematic library defined in the pyproject.toml file may be needed.
According to the Docker Image’s documentation, Qdrant database works on the Linux/AMD64 Os/Architecture.
faiss-cpu library is used instead of faiss due to the former being implemented for Python’s version <=3.7 only.
A fixed version of Qdrant (v0.10.3) is being used due to its fast development and storage’s versioning. Not only is a library being versioned, but collection structure does too. In consequence a collection built on Qdrant version 0.9.X is unreadable by version 0.10.X.
On first run of the Streamlit application, when running Find Similar Images button for the first time, models are being loaded to the library. This is a one time event and will not influence a performance for future searches.
Aditya Khosla, Nityananda Jayadevaprakash, Bangpeng Yao and Li Fei-Fei. Novel dataset for Fine-Grained Image Categorization. First Workshop on Fine-Grained Visual Categorization (FGVC), IEEE Conference on Computer Vision and Pattern Recognition (CVPR), 2011.
J. Deng, W. Dong, R. Socher, L.-J. Li, K. Li and L. Fei-Fei, ImageNet: A Large-Scale Hierarchical Image Database. IEEE Computer Vision and Pattern Recognition (CVPR), 2009.
Rasmus Rothe and Radu Timofte and Luc Van Gool, Deep expectation of real and apparent age from a single image without facial landmarks, International Journal of Computer Vision, 2018.
Rasmus Rothe and Radu Timofte and Luc Van Gool, Deep EXpectation of apparent age from a single image, IEEE International Conference on Computer Vision Workshops, 2015.
The Shinobi Component Library (SCL) is a collection of meticulously built standard web components for you to use in any web project. Visit our website here!
About Web Components
It can be overwhelming trying to learn everything on web components. We recommend our short guide and the included “Recommended Resources” section.
Installation
Each component of our library is encapsulated into one JavaScript file. You can add Shinobi by downloading the source files (src.zip) from the releases page, then adding them to your project.
Alternatively, you can link to the auto-generated CDN link, provided by jsdelivr.
If you’d like to contribute or read the source code, you can:
Install using npm install shinobirockstar
Download the zip file from Github
Clone the project using git clone https://github.com/ucsd-cse112/cse112-sp19-team10.git
Note:
If you are using Font-Awesome icons, you need to follow their instructions to include their library in your project. Our library does not include Font-Awesome or other external libraries we are using in demos, such as Bootstrap.
The CDN is auto-generated by jsdelivr from our project on npm, which is currently not auto-updated. Github will always have the most up to date files.
Getting Started
Each component is named core-COMPONENT_NAME, where COMPONENT_NAME is the name of the component. Each component comes with default values allowing you to get started using just one simple line of code.
Our project uses the Standard JavaScript Style, (also known as StandardJS), found at standardjs.com
Read more about our coding style here.
Component Architecture
We are using a very straightforward architecture for the components. It should be easy to tell by reading the code. In case you are unsure, read this short explanation here.
Repo Structure
Learn about how our project directories are set up here.
Dependencies
Dependencies are listed under dependencies and devDependencies in the package.json. This will have the most up-to-date list.
This is a list of each dependencies:
mocha: unit tests
showroom:
chai: asserts
husky: pre-commit tasks using Github hooks
standard: linter
testcafe: browser testing framework
testcafe-browser-provider-saucelabs: use testcafe with saucelabs
Updating the README
The README is using a shell script to generate the table of contents. Since the README is not often updated, this script must be manually run to update the table of contents, but they can also be edited manually.
To run the script, follow the directions to set up the script then run:
./utils/gh-md-toc --insert README.md
Testing
For unit tests, we are using Mocha and Showroom. Read about how to modify existing tests and write new ones in our unit testing guide.
See our full list for all the tests for each component
Known Issues
Browser tests on TestCafe/SauceLabs sometimes time out, usually with a ETIMEOUT or similar error. This causes Travis builds to fail and blocks pull requests on Github. Rerunning the build on Travis generally fixes this issue.
We are using Showroom, Mocha, and Chai for our unit testing. Unfortunately, this does not integrate well with CodeClimate’s test coverage reporter. However, rest assured as we many have unit and browser tests and are confidently it covers a majority of cases.
Change Log
This project is set up to use semantic-release to generate a change log from the git commit messages. Please follow the format as outline in their docs. However, it has not been fully tested or integrated to the master branch. You can read our implementation notes here.
Team
The Shinobi Component Library is brought to you by Team Rockstar Ninjas, a group of students from UCSD’s CSE 112 course. Meet the team!
A simple gradle plugin that lets you create a download asset from zeplin and convert them to vector drawables automatically
🐘 project using 100% Kotlin and be up and running in a few seconds.
How to use 👣
The plugin is developed based on Zeplin API, it’s used zeplin OAuth2 to verify the project have correct access.
try to add the plugin to the project.gradle you want to use,
plugins {
    ...
    id("io.github.underwindfall.zeplin.gradle")
}

zeplinConfig {
    zeplinToken.set("input the correct zeplin token")
    configFile.set(file("input the correct zeplin file"))
}
then execute the script that’s it !
./gradlew your_project:updateZeplin
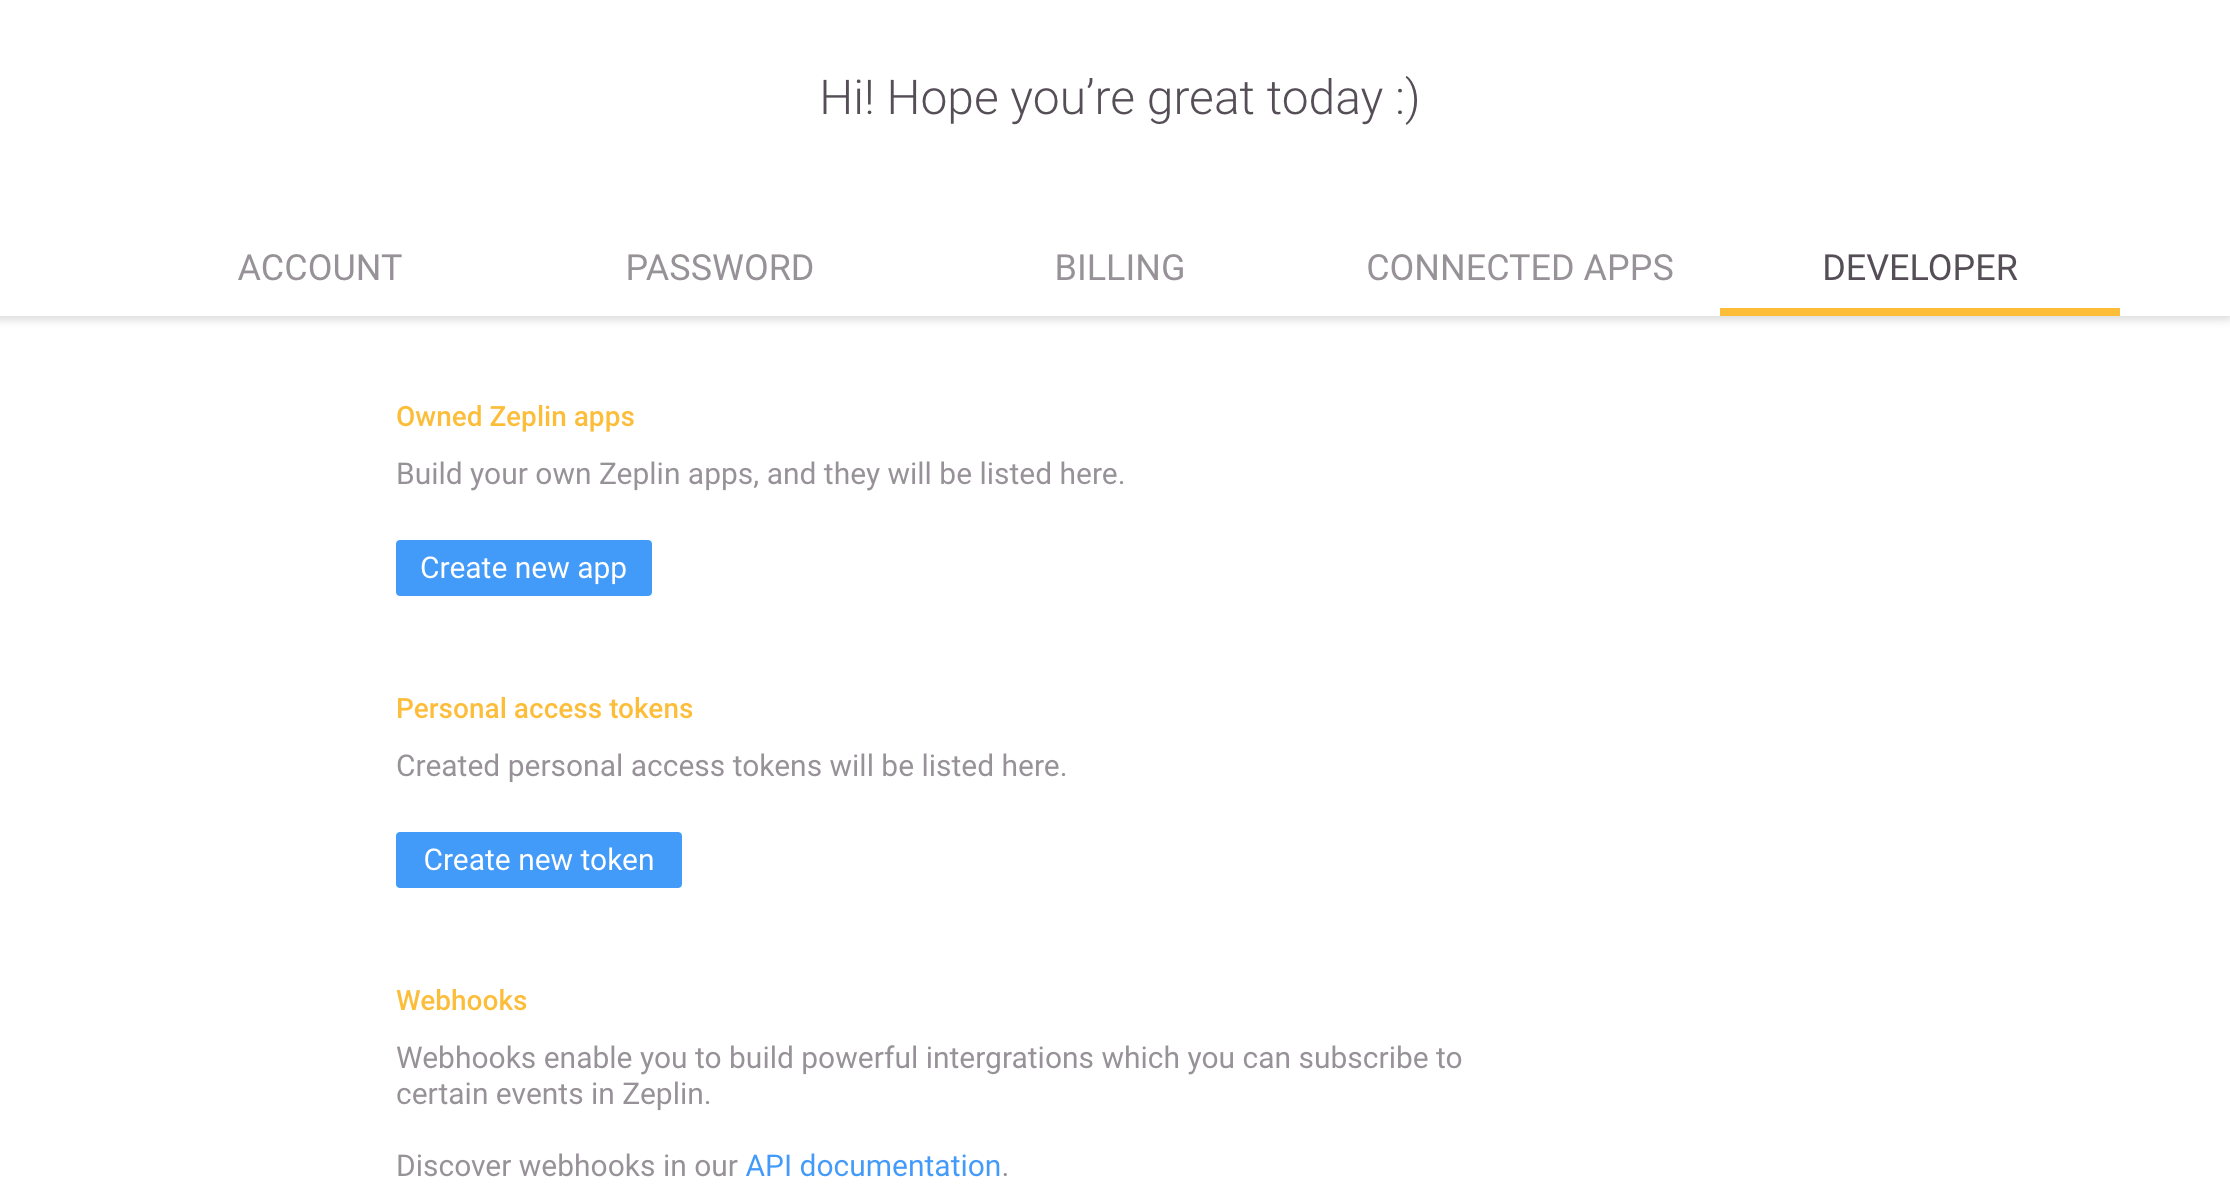
Zeplin Developer Token 🔍
To use this plugin, you either need to create a personal access token or a Zeplin app.
You can create them from the web app under Developer tab in your profile page.
Configuration ⚙️
Before starting directly zeplin script, besides that zeplin token above, we also need a configuration file to tell plugin
which kind of assets the plugin want to download.
tag of screens which allow you download the assets with the same name collection
outputDir
output directory where you want to assign plugin to put converted assets into
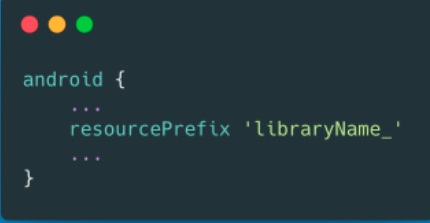
resourcePrefix
android resource prefix to avoid resource conflicts
deniedList
denied list screens in case some of screens you want to include
allowList
denied list screens in case some of screens you want to exclude
Example 📦
The example project is to display how the zeplin works and what kind of configuration needs to be added
you can check it in example folder.
Features 🎨
100% Kotlin-only.
Zeplin API and vector drawable converted automatically
Plugin build setup with composite build.
CI Setup with GitHub Actions.
Contributing 🤝
Feel free to open an issue or submit a pull request for any bugs/improvements.
This plugin is based on static analysis check, you can use preMerge task to test it.
A preMerge task on the top level build is already provided in the project. This allows you to run all the check tasks both in the top level and in the included build.
You can easily invoke it with:
./gradlew preMerge
If you need to invoke a task inside the included build with:
./gradlew -p plugin-build <task-name>
License 📄
This template is licensed under the Apache License – see the License file for details.
Please note that the generated template is offering to start with a MIT license but you can change it to whatever you wish, as long as you attribute under the MIT terms that you’re using the template.


 https://github.com/dl-alexandre/SymbolGrid