DSA-Bootcamps is a initiative by Code Dazzlers to help students in problem solving. Here you will going to solve 200++ problems in the span of 6 week from all DSA topics.
All session will be live on Google Meet.
If you miss the live session, you can checkout the recorded session at our youtube channel.
새로 기록하는 dp에 이전경로 전체를 포함하는 경로가 아닌… 바로 이전 위치만을 표기하는 것이 보통 더 좋다. 출력할때 는 역추적하여 출력하면 됨
학습내용:
2020년
Dynamic Programming; DP
특정 범위까지의 값을 구하기 위해서 그것과 다른 범위까지의 값을 이용하여 효율적으로 값을 구하는 알고리즘 설계 기법이다.
조금 장난스럽게 말해서 답을 재활용하는 거다. 앞에서 구했던 답을 뒤에서도 이용하고, 옆에서도 이용하고…엄밀히 말해 동적 계획법은 구체적인 알고리즘이라기보다는 문제해결 패러다임에 가깝다. 동적 계획법은 “어떤 문제를 풀기 위해 그 문제를 더 작은 문제의 연장선으로 생각하고, 과거에 구한 해를 활용하는” 방식의 알고리즘을 총칭한다.
DP알고리즘- LIS알고리즘(+LCS)알고리즘
#include<vector>//LIS알고리즘intmain() {
vector<int> v;
int N; //N수열 갯수
cin >> N;
int k;
for (int i = 0; i < N; i++) {
cin >> k; //수열을 하나씩auto it = lower_bound(v.begin(), v.end(), k);
// 알맞은 자리 찾기
*it = k;
}
cout << v.size() << '\n';
}
//LCS 알고리즘for (int i = 1; i <= len1; i++) {
for (int j = 1; j <= len2; j++) {
if (str1[i - 1] != str2[j - 1]) {
DP[i][j] = max(DP[i - 1][j], DP[i][j - 1]);
}
else {
DP[i][j] = DP[i - 1][j - 1] + 1;
}
}
}
cout << DP[len1][len2] << '\n';
이차원 배열 , 배열을 이용해서 이전값,과 계속 비교해서 최적의 값을 찾는 DP
약수 구할때
vector<int> v;
for(int i=1; i<=n ;i++){
if(n % i ==0)
v.push_back(i);
} //이런 식으로 구하는 것 보다for (int i = 2; i * i <= g; i++)
if (!(g % i)) {
ans.push_back(i);
if (i != g / i) ans.push_back(g / i);
}//이렇게 하고 필요하면 sort로 정렬하는것이 한참 빠르다
유클리드 호제법 – 두 수의 최대 공약수 구하기
intgcd(int a, int b)
{
return b ? gcd(b, a%b) : a;
}
intgcd(int a, int b)
{
int c;
while(b)
{
c = a % b;
a = b;
b = c;
}
return a;
}
이항정리
페르마 소정리
피보나치수 피사노주기(피보나치수의 어떠한 수에 나머지는 일정주기가 있음 생각해 보면 당연한 것 )
p(n)= abc,p(n+1)=abc+1 일때
p(n*자연수+ i )%abc= p(i)% abc= p(i) 일것.
벨만 포드 알고리즘, 다익트라알고리즘
다익트라 알고리즘
매번 방문하지 않은 노드 중에서 최단 거리가 가장 짧은 노드를 선택합니다.
음수 간선이 없다면 최적의 해를 찾을 수 있습니다.
벨만 포드 알고리즘
매번 모든 간선을 전부 확인합니다.
따라서 다익스트라 알고리즘에서의 최적의 해를 항상 포함합니다. 시간복잡도는 더 높음
다익스트라 알고리즘에 비해서 시간이 오래 걸리지만 음수 간선 순환을 탐지 할 수 있습니다.
importsysinput=sys.stdin.readlineINF=int(1e9) #무한을 의미하는 값으로 10억을 설정defbf(start):
# 시작 노드에 대해서 초기화dist[start]=0# 전체 n번의 라운드(round)를 반복foriinrange(n):
# 매 반복마다 "모든 간선"을 확인하며forjinrange(m):
cur=edges[j][0]
next_node=edges[j][1]
cost=edges[j][2]
# 현재 간선을 거쳐서 다른 노드로 이동하는 거리가 더 짧은 경우ifdist[cur] !=INFanddist[next_node] >dist[cur] +cost:
dist[next_node]=dist[cur]+cost# n 번째 라운드에서도 값이 갱신 된다면 음수 순환이 존재ifi==n-1:
returnTruereturnFalse# 노드의 개수, 간선의 개수 입력받기n,m=map(int, input().split())
# 모든 간선에 대한 정보를 담는 리스트 만들기edges= []
# 최단 거리 테이블을 모두 무한으로 초기화dist=[INF] * (n+1)
# 모든 간선 정보를 입력 받기 for_inrange(m):
a, b, c=map(int, input().split())
# a번 노드에서 b번 노드로 가는 비용이 c라는 의미edges.append((a,b,c))
# 벨만 포드 알고리즘을 수행negative_cycle=bf(1) # 1번 노드가 시작노드ifnegative_cycle:
print("-1")
else:
# 1번 노드를 제외한 다른 모든 노드로 가기 위한 최단 거리 출력foriinrange(2,n+1):
# 도달할 수 없는 경우, -1을 출력ifdist[i] ==INF:
print("-1")
# 도달할 수 있는 경우 거리를 출력else:
print(dist[i])
플로이드 와샬 알고리즘
모든 정점에서 다른 모든 정점으로의 최단경로를 찾는 알고리즘
이차원 배열로 각 정점에서 각정점으로가는 최단거리 초기화 후, 각 정점을 지난다고 가정하여 반복문
# baek11779 최소비용 구하기2 importsysinput=sys.stdin.readlinen=int(input())
m=int(input())
INF=int(1e9)
# 입력 ,변수 초기화edges=[[INFforiinrange(n+1)]for_inrange(n+1)]
for_inrange(m):
a,b,c=map(int,input().split())
edges[a][b]=min(c,edges[a][b]) # 경로가 같은데 비용이 다른 것 있다는 언급이 없었지만 생각했어야..start_city,end_city=map(int,input().split())
costs=[INFforiinrange(n+1)] # 다익스트라 start_city에서의 거리 배열parents=[0foriinrange(n+1)] # 경로 추적용 이전위치visitied=[Falseforiinrange(n+1)]
deffind_lowest_cost_node(costs): # 다익스트라 최단거리 찾는 함수lowest_cost=INFlowest_cost_node=Nonefornodeinrange(len(costs)):
cost=costs[node]
ifcost<lowest_costandvisitied[node]==False:
lowest_cost=costlowest_cost_node=nodereturnlowest_cost_node# 다익스트라node=start_citycosts[start_city]=0visitied[start_city]=TruewhilenodeisnotNone:
cost=costs[node]
neighbors=edges[node]
foriinrange(len(neighbors)):
new_cost=cost+neighbors[i]
ifcosts[i]>new_cost: # 현재 가지고 있는 cost보다 최단 거리 라면costs[i]=new_costparents[i]=nodevisitied[node]=Truenode=find_lowest_cost_node(costs)
print(costs[end_city])
trace=[]
current=end_citywhilecurrent!=start_city:
trace.append(current)
current=parents[current]
trace.append(start_city)
trace.reverse()
print(len(trace))
foriintrace:
print(i,end=' ')
트리의 지름 (임의의 두 노드 중 가장 먼 노드 길이)
# baek1167 트리의 지름# 트리의 지름을 구하는 방법은 정해져있다. # 먼저 임의의 정점부터 모든 정점까지의 거리를 구하여 # 가장 먼 거리를 가진 정점을 구한다. # 그 후에 그 정점으로부터 모든 정점까지의 거리를 다시 구해서 # 그 거리들 중 가장 먼 값이 트리의 지름이 된다.importsysinput=sys.stdin.readline# inputv=int(input())
# variable initedge=[[] for_inrange(v+1)]
visited=[Falsefor_inrange(v+1)]
maxIndex=0# 최대 값 indexmaxDistance=0# 최대 값defdfs(node ,cost): #dfs함수globalmaxDistanceglobalmaxIndexifvisited[node] !=False: #첫 방문 시에만 진행returnifmaxDistance<cost: # 최대값 설정maxDistance=costmaxIndex=nodevisited[node] =True# 방문 설정fornext,disinedge[node]: # 연결된 노드 dfsdfs(next,cost+dis)
# inputforiinrange(1,v+1):
temp=input().split()
forjinrange(1,len(temp)-1,+2):
edge[i].append([int(temp[j]),int(temp[j+1])])
# 임의의 노드(1)에서 dfs(bfs)수행 후 dfs(1,0)
# 가장 먼 노드에서 다시 dfs(bfs)수행 하면for_inrange(v+1): visited[_]=Falsedfs(maxIndex,0)
# 이때 나온 최장 거리가 트리의 지름print(maxDistance)
파이썬의 재귀함수최대는 1000
재귀함수를 사용할 때 ,맞는 거 같은데 이상하게 런타임 에러가 발생할 때는 sys.setrecursionlimit(10**9)
을 이용해 재귀함수 제한을 늘려서 시도
Union_find (합집합 찾기)
재귀를 이용하여 – 이것도 재귀 깊이 제한을 늘려야한다
# baek1717 집합의 표현importsysinput=sys.stdin.readlinesys.setrecursionlimit(10**9)
n,m=map(int,input().split())
arr=[-1for_inrange(n+1)]
parent=[_for_inrange(n+1)]
defgetParent(parent,x): # 부모 노드를 찾는 함수ifparent[x]==x : returnxparent[x]=getParent(parent,parent[x])
returnparent[x]
defunionParent(parent,a,b):# 두 부모 노드를 합치는 함수a=getParent(parent,a)
b=getParent(parent,b)
ifa<b: parent[b]=aelse : parent[a]=bdefcheckUnion(parent,a,b): # 두 노드가 같은 부모노드를 가지는지 확인하는 함수a=getParent(parent, a)
b=getParent(parent, b)
ifa==b: returnTruereturnFalsefor_inrange(m):
check,a,b=map(int,input().split())
ifcheck==0:
unionParent(parent,a,b)
elifcheck==1:
ifcheckUnion(parent,a,b):
print("YES")
else:
print("NO")
크루스칼 알고리즘
가장 가중치가 낮은 간선부터 정렬하여 union find를 사용하여 연결되어 있지 않은 집합끼리 간선 연결, 모든 정점이 연결되면 종료
# baek1197 최소 스패닝 트리fromcollectionsimportdequeimportsysinput=sys.stdin.readlinesys.setrecursionlimit(10**9)
# union-find 함수들defgetParent(parent,x): # 부모 노드를 찾는 함수ifparent[x]==x : returnxparent[x]=getParent(parent,parent[x])
returnparent[x]
defunionParent(parent,a,b):# 두 부모 노드를 합치는 함수a=getParent(parent,a)
b=getParent(parent,b)
ifa<b: parent[b]=aelse : parent[a]=bdefcheckUnion(parent,a,b): # 두 노드가 같은 부모노드를 가지는지 확인하는 함수a=getParent(parent, a)
b=getParent(parent, b)
ifa==b: returnTruereturnFalse# union-find 함수들# inputv,e=map(int,input().split())
parent=[ _for_inrange(v)]
edges=[]
for_inrange(e):
a,b,c=map(int, input().split())
edges.append([c,a-1,b-1])
edges=sorted(edges) # 정렬 후cnt=0# 현재 연결된 정점 갯수 확인을 위한total_weight=0# 최소 가중치 합 forweight,a,binedges: # 정렬된 간선으로 반복문ifnotcheckUnion(parent,a,b): # 현재 간선의 두 정점이 연결되어 있지 않으면total_weight+=weight# 최소 가중치 합에 포함cnt+=1unionParent(parent,a,b) # 연결되었음을 union-find 기법으로ifcnt>=v-1: # 모두 연결되엇으면-종료breakprint(total_weight) # 결과 출력
어떤 작업(예제에서는, 앞으로 한 칸 가기)을 여러 번 반복해야 할 때, 이를 빠르게 처리할 수 있게 해 줍니다.
하나의 값을 채우기 위해서, table을 두 번 연속으로 참조하는 과정이 들어갑니다.
정점이나 원소의 개수(N)뿐만 아니라, 반복할 횟수(K)가 시간·공간복잡도에 들어갑니다.
만약 이 K가 20, 30 하는 정도로 굉장히 작다면 sparse table의 크기도 굉장히 작아지고, 사실 쓸 필요가 없을 수도 있습니다.
반대로 K가 굉장히 커져서 2^64까지도 간다면 sparse table의 크기도 커집니다. *“어차피 log를 붙이면 64배밖에 안 되는 거 아냐?”* 하고 생각하실 지도 모르지만, N=500,000 (50만)인 경우에 (64·N)짜리 int 배열의 크기는 122 MiB나 됩니다. 메모리 제한이 빡빡하다면 어려울 지도 몰라요.
기록 대상을 미리 알고 있어야 하며, 중간에 바뀌면 안 됩니다. 예를 들어 한 화살표가 바뀌면, 그로 인해 배열 전체를 갈아엎고 새로 계산해야 할 지도 모릅니다. 그러면 전처리(preprocessing)를 해놓은 의미가 없죠.
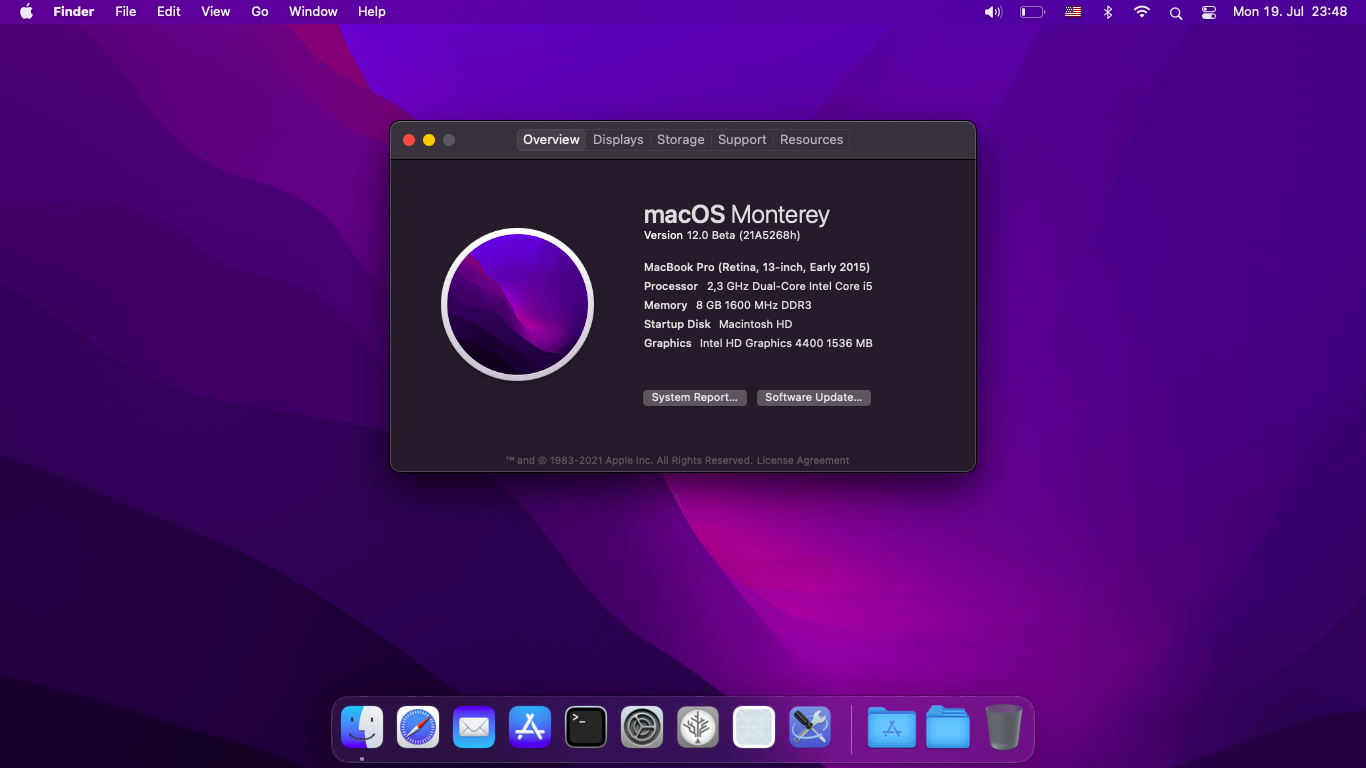
SMBIOS bumped to MacBookPro12,1 since Monterey dropped support for older Macs.
Installer will not boot on without proper power management since macOS 10.15.
Booting from USB will either require installing with a port limit patch + USB2 or my USBMap.kext.
My USBMap will only work for MacBookPro12,1 SMBIOS.
Inbuilt Intel WiFi may work with itlwm, but can’t test since I sold and replaced. I use Broadcom BCM94352HMB (only use Brcm kexts if you also have this setup).
Either way make sure using BlueToolFixup.kext instead of BrcmBluetoothInjector.kext or IntelBluetoothInjector.kext on macOS 12.
What works (as of macOS 12 beta 2):
Ethernet
USB / Card Reader
Battery Status (patched)
Multi-touch Trackpad Gestures
Hotkeys for Audio and Brightness (patched)
Audio
Out: Speakers, Jack and HDMI
In: Webcam (Motherboard does not support combojack input)
Webcam + Microphone
WIFI/Bluetooth – Broadcom BCM94352HMB (see BIOS whitelist removal)
Also big thanks to RehabMan for all his amazing resources.
Flashing your BIOS / Whitelist removal
Only do this with guidance of an expert
You won’t be able to flash a new BIOS from a USB stick since this is write protected (even with sleep bug). This laptop sadly has no Libreboot / Coreboot support, so you will need to get someone to unlock your image for you.
Get in touch with an expert bios-mods (or contact the guy who helped me at pythonic2016@gmail.com). I don’t get paid for linking this, I am just happy with the result and their work. Consider giving them a good tip!
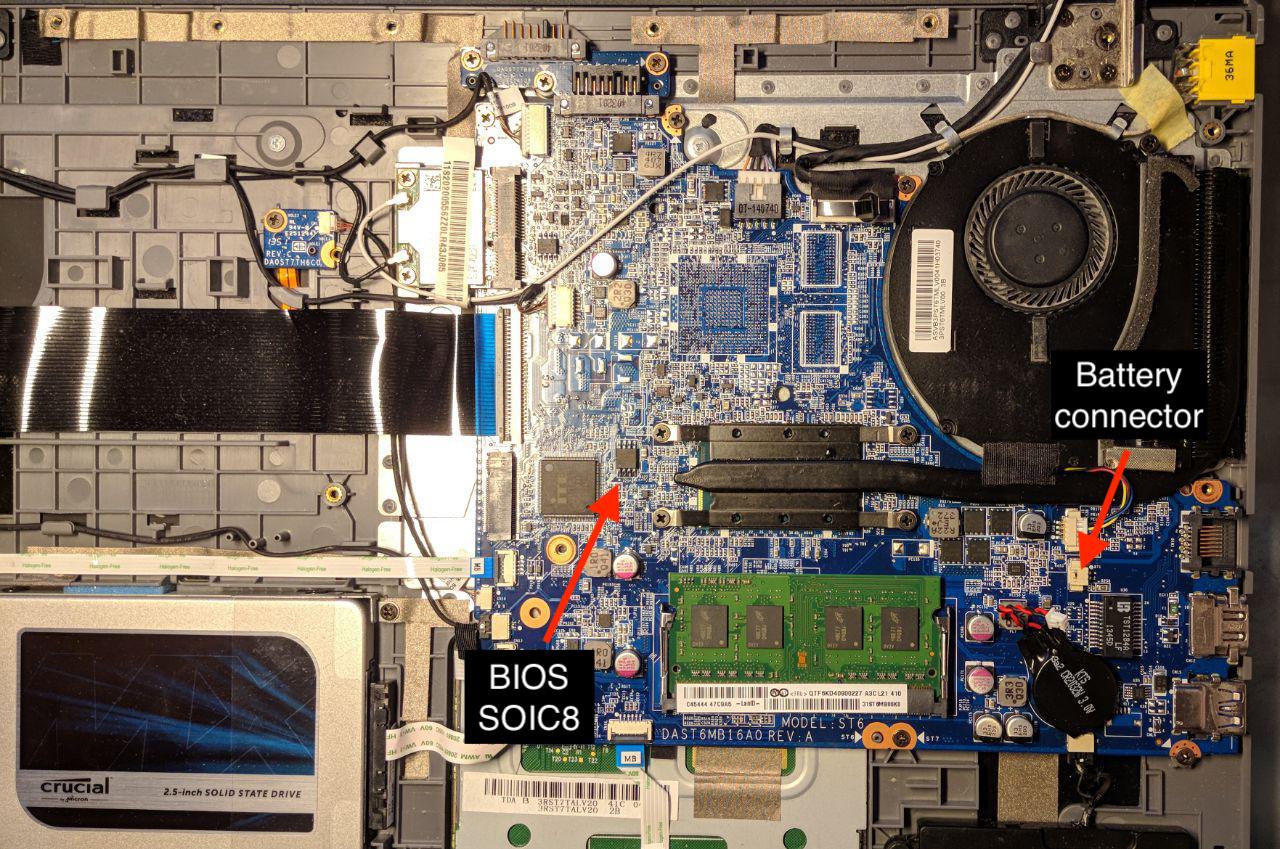
Once you have a person to help you. Open up your laptop and unplug your batteries (CMOS and the main battery that you need to remove in order to open up the laptop).
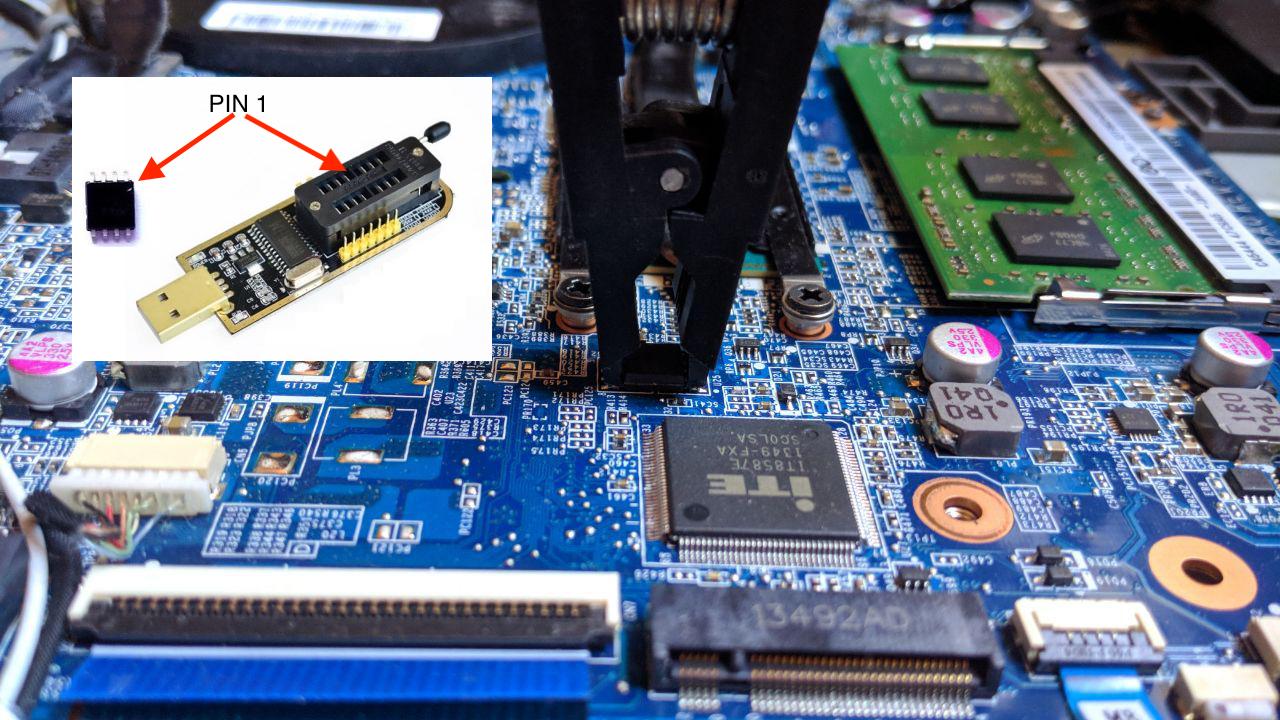
Locate your BIOS Chip (W25Q64BV ID:0xEF4017 Size: 8192KB). In terms of connecting the clip cable make sure PIN 1 of SPI and the Chip; there is a little mark; are connected (HQ Images on Github).
Use the Software (CH341A) provided by your expert and create a dump. Send it to him and he will provide you with a new flashable image.
You should be done if you did everything right. Test your laptop and if everything works upgrade your hardware!
Installation
Add Serial / UUID / MLB for MacBookPro12,1
Remove / Disable Brcm Kexts if you don’t use a Broadcom card.
Run the install command for ALCPlugFix if you face AUX hotplug issues (see misc)
Manually creating DSDT/SSDT files
Read up on one of RehabMan’s guides and apply following patches:
Hemo is a portmanteau (i.e. [H]anami + D[emo] = Hemo) which is designed to provide a fully working demo Hanami application as built by the Hanamismith gem.
⚠️ This application is meant for demonstration purposes only which means all commits are heavily rebased as new functionality is implemented. You can definitely clone this project — and is encouraged — but I wouldn’t recommend forking this project because the SHAs will be constantly changing since each commit is meant to tell a story so people can learn how this application was architected. If you do clone (or download) a copy of this application, please note you’ll have to re-clone/download with any new changes pushed to this repository.
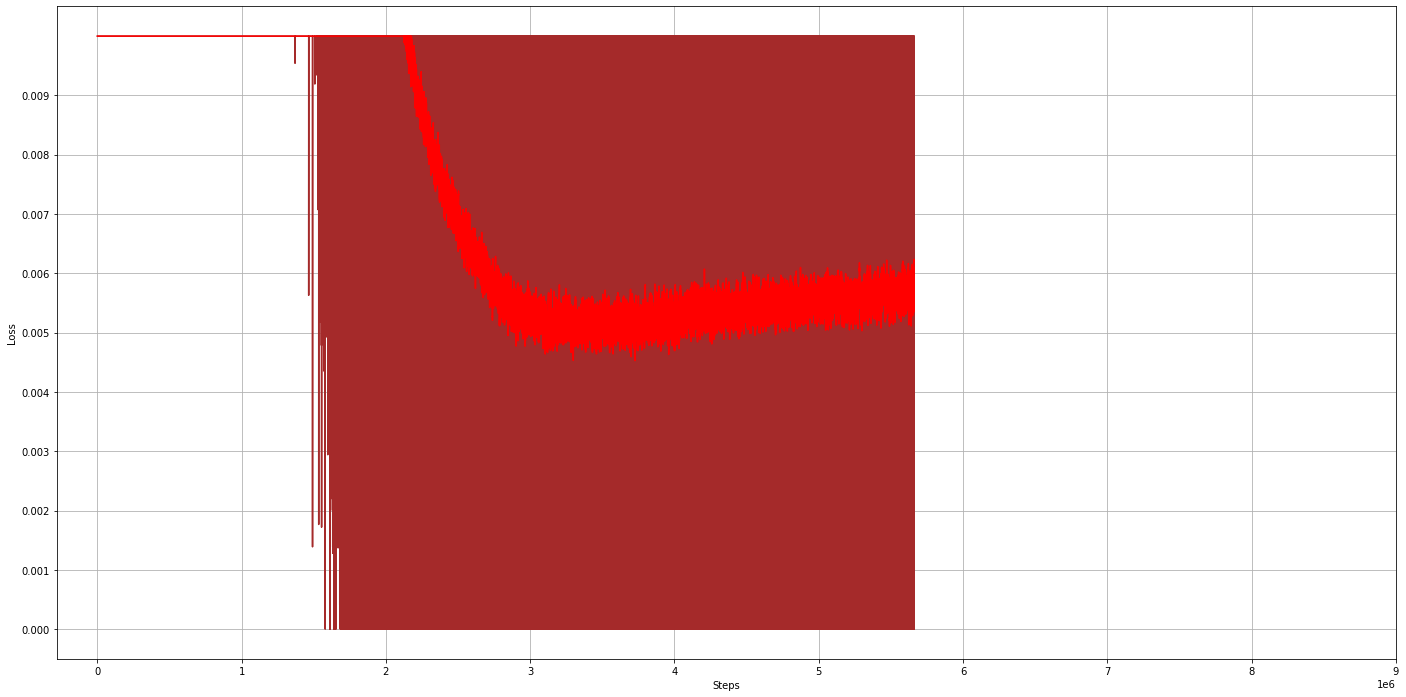
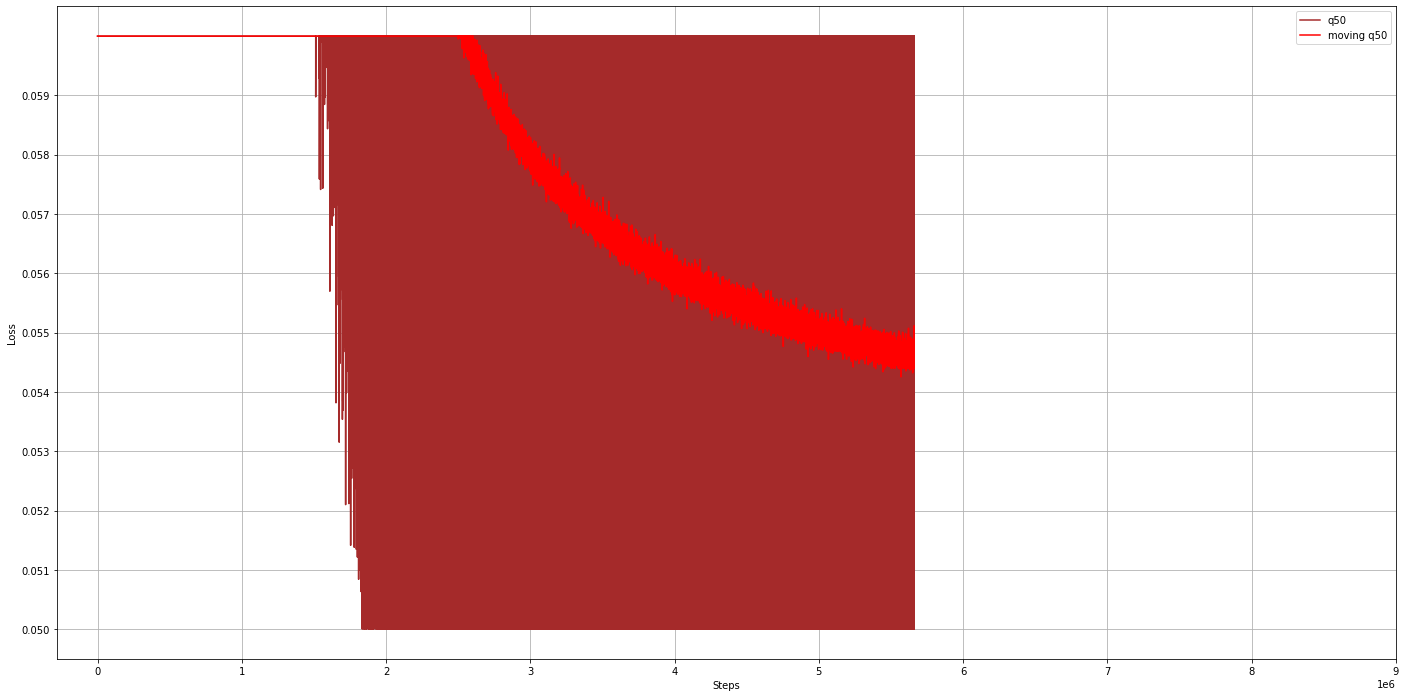
Performance is just about 0.10 on gloss 50 metric on elect 1d dataset.
I arranged layer normalization after each layer calculation and dropouts are just before layer. Otherwise, it does not work for me. It seems, layer should see/have those dropout zeros without them being leveled by layer normalization.
I’m getting similar performance with 2 or 3 layers, 4 heads and 128 width. It is likely that changing width and number of heads, could improve prformance. it is just taking in a range of 1000 epochs for me.
I noticed that qloss training results in high error for some items. I think rmse error would pay more attention to outliers
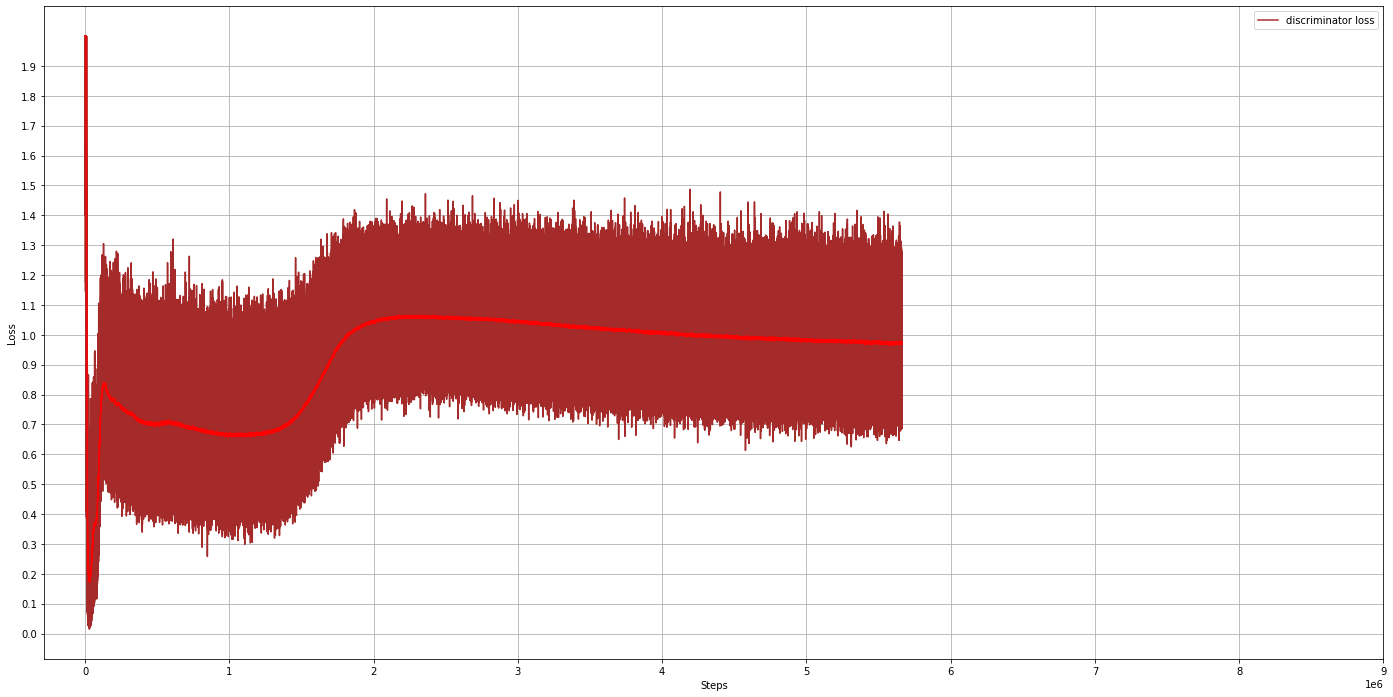
With adversarial Training I go 0.10 on q50 compare to 0.11 without it. It is just small difference
Prediction is done. Obviously, dataset should be continuation of the same time series! Probably, dataset should have TRAIN, VALIDATION, maybe TEST/PREDICT sets.
I do not mask in decoder since there is no labels , it is non-auto-regressive
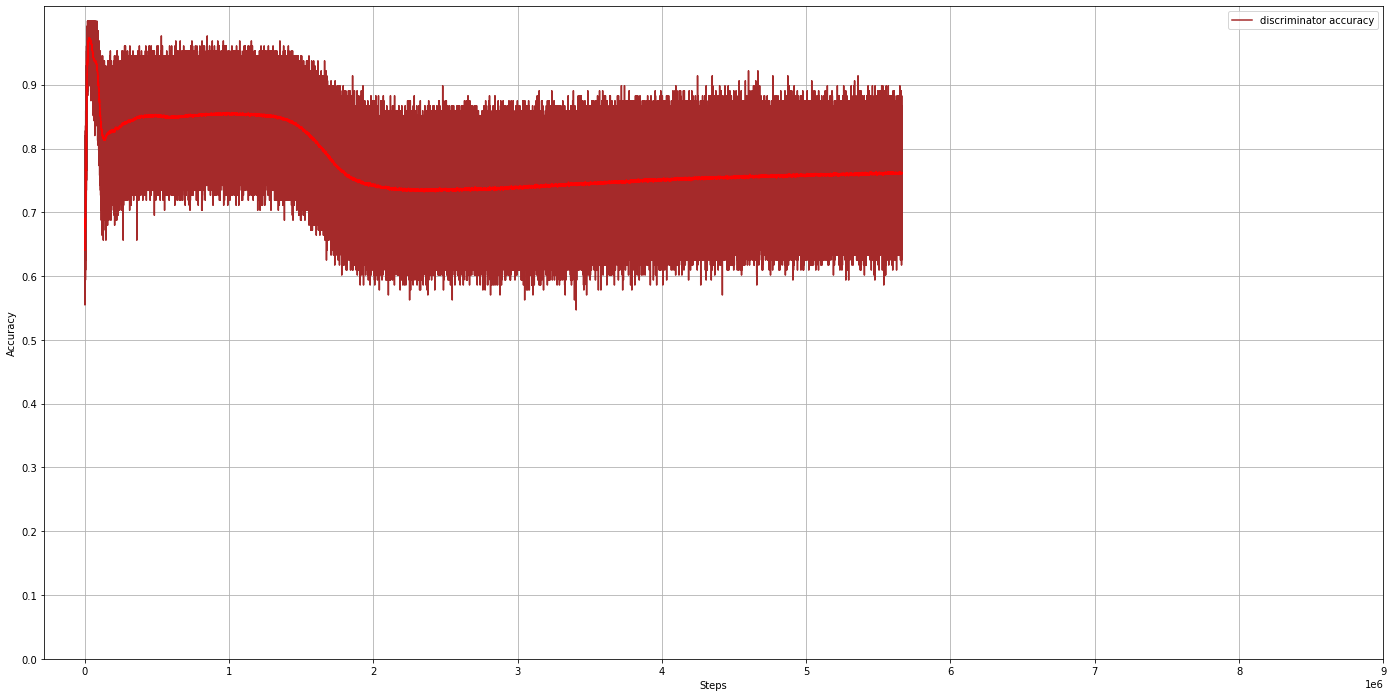
Discriminaror performance is like 0.75. It should be closer to .50 I guess!
To do/try:
Sparse function is not implemented. Sparsemax function is available with Tensorfow 2 – tensorflow_addons. It may improve performance to make these zero weights
I want to see performance with more hidden layer width and more heads
Commands:
Prepare datasets:
download LD2011_2014.txt. I use data subfolder in the sample commands
Performance is just about 0.10 on gloss 50 metric on elect 1d dataset.
I arranged layer normalization after each layer calculation and dropouts are just before layer. Otherwise, it does not work for me. It seems, layer should see/have those dropout zeros without them being leveled by layer normalization.
I’m getting similar performance with 2 or 3 layers, 4 heads and 128 width. It is likely that changing width and number of heads, could improve prformance. it is just taking in a range of 1000 epochs for me.
I noticed that qloss training results in high error for some items. I think rmse error would pay more attention to outliers
With adversarial Training I go 0.10 on q50 compare to 0.11 without it. It is just small difference
Prediction is done. Obviously, dataset should be continuation of the same time series! Probably, dataset should have TRAIN, VALIDATION, maybe TEST/PREDICT sets.
I do not mask in decoder since there is no labels , it is non-auto-regressive
Discriminaror performance is like 0.75. It should be closer to .50 I guess!
To do/try:
Sparse function is not implemented. Sparsemax function is available with Tensorfow 2 – tensorflow_addons. It may improve performance to make these zero weights
I want to see performance with more hidden layer width and more heads
Commands:
Prepare datasets:
download LD2011_2014.txt. I use data subfolder in the sample commands
This repository contains the official reference implementation of the Dilithium signature scheme, and an optimized implementation for x86 CPUs supporting the AVX2 instruction set. Dilithium is standardized as FIPS 204.
Build instructions
The implementations contain several test and benchmarking programs and a Makefile to facilitate compilation.
Prerequisites
Some of the test programs require OpenSSL. If the OpenSSL header files and/or shared libraries do not lie in one of the standard locations on your system, it is necessary to specify their location via compiler and linker flags in the environment variables CFLAGS, NISTFLAGS, and LDFLAGS.
For example, on macOS you can install OpenSSL via Homebrew by running
before compilation to add the OpenSSL header and library locations to the respective search paths.
Test programs
To compile the test programs on Linux or macOS, go to the ref/ or avx2/ directory and run
make
This produces the executables
test/test_dilithium$ALG
test/test_vectors$ALG
where $ALG ranges over the parameter sets 2, 3, and 5.
test_dilithium$ALG tests 10000 times to generate keys, sign a random message of 59 bytes and verify the produced signature. Also, the program will try to verify wrong signatures where a single random byte of a valid signature was randomly distorted. The program will abort with an error message and return -1 if there was an error. Otherwise it will output the key and signature sizes and return 0.
test_vectors$ALG performs further tests of internal functions and prints deterministically generated test vectors for several intermediate values that occur in the Dilithium algorithms. Namely, a 48 byte seed, the matrix A corresponding to the first 32 bytes of seed, a short secret vector s corresponding to the first 32 bytes of seed and nonce 0, a masking vector y corresponding to the seed and nonce 0, the high bits w1 and the low bits w0 of the vector w = Ay, the power-of-two rounding t1 of w and the corresponding low part t0, and the challenge c for the seed and w1. This program is meant to help to ensure compatibility of independent implementations.
Benchmarking programs
For benchmarking the implementations, we provide speed test programs for x86 CPUs that use the Time Step Counter (TSC) or the actual cycle counter provided by the Performance Measurement Counters (PMC) to measure performance. To compile the programs run
make speed
This produces the executables
test/test_speed$ALG
for all parameter sets $ALG as above. The programs report the median and average cycle counts of 10000 executions of various internal functions and the API functions for key generation, signing and verification. By default the Time Step Counter is used. If instead you want to obtain the actual cycle counts from the Performance Measurement Counters export CFLAGS="-DUSE_RDPMC" before compilation.
Please note that the reference implementation in ref/ is not optimized for any platform, and, since it prioritises clean code, is significantly slower than a trivially optimized but still platform-independent implementation. Hence benchmarking the reference code does not provide representative results.
Our Dilithium implementations are contained in the SUPERCOP benchmarking framework. See here for current cycle counts on an Intel KabyLake CPU.
Randomized signing
By default our code implements Dilithium’s hedged signing mode. To change this to the deterministic signing mode, undefine the DILITHIUM_RANDOMIZED_SIGNING preprocessor macro at compilation by either commenting the line
#define DILITHIUM_RANDOMIZED_SIGNING
in config.h, or adding -UDILITHIUM_RANDOMIZED_SIGNING to the compiler flags in the environment variable CFLAGS.
Shared libraries
All implementations can be compiled into shared libraries by running
make shared
For example in the directory ref/ of the reference implementation, this produces the libraries
libpqcrystals_dilithium$ALG_ref.so
for all parameter sets $ALG, and the required symmetric crypto library
libpqcrystals_fips202_ref.so
All global symbols in the libraries lie in the namespaces pqcrystals_dilithium$ALG_ref and libpqcrystals_fips202_ref. Hence it is possible to link a program against all libraries simultaneously and obtain access to all implementations for all parameter sets. The corresponding API header file is ref/api.h, which contains prototypes for all API functions and preprocessor defines for the key and signature lengths.