Author: qjc8wzc823dl

  • Raspberry-Pi-Vinyl-Streamer

    Guide for Hi-Fi analog to digital audio streaming guide using Icecast and Darkice on a Raspberry Pi

    This repository provides all the tools and step-by-step guide needed to convert a high-fidelity audio source into a high-quality digital audio stream, making your vinyl record collection or other analog audio sources accessible across a wide range of digital platforms using Icecast.

    At the heart of this setup is the Raspberry Pi, a small and affordable ARM-based computer that serves as the audio streaming server (commonly referred to as music streamer or network streamers when sold as a prebuilt applicance).

    Other than your audio source you are also going to need an external audio capture device that provides line-in interface ports and ADC (analog-to-digital converter) + an external preamplifier if your turntable does not have built-in preamp (or if want to disable the built-in preamp).

    An alternative to using an external audio capture device is to buy an audio source with embedded USB audio codec output, like a “USB turntable” (there are several different models of “USB turntables” of various quality on the market but many might not be suitable for audiophiles).

    How It Works (Architecture):

    Disclaimer: I have personally tested this solution using the combination of a Behringer UCA202 USB Audio Device for analogue-to-digital conversion and capturing + a PHONO PP400 preamplifier, but in theory this method should work with every other Raspberry-compatible capture device and with any other preamplifier.

    1. Preamplication: Your turntable’s audio output is first routed through a preamplifier (also known as a phono preamp), that converts a weak signal into an output signal strong enough to be noise-tolerant and strong enough for further processing. Without this preamplication, the final signal would be noisy or distorted. The preamp also ensures that your records sound balanced and accurate.

    2. Analog Audio Capture and Digital Conversion: The amplified signal from the pre-amp is fed into the audio capture device, where it is digitized using its ADC (analogue-to-digital converter) and sent to the Raspberry Pi.

    3. Streaming: On the Raspberry Pi, two critical software components that come into play:

      • Darkice: This live audio streamer that captures/records the digital audio from the audio interface and encodes it into a streamable audio format.
      • Icecast: This “internet radio” streaming media server takes the encoded audio from Darkice and broadcasts it, making it accessible to listeners locally via HTTP URL or over the internet.

    Setup Options:

    • Quick Start: For those eager to get started, a pre-configured Raspberry Pi image is available for download. Simply flash it onto a Micro SD card, insert the card into your Raspberry Pi, and you’re ready to stream.

    • Manual Configuration: For users who prefer to fine-tune their setup, step-by-step instructions are provided for configuring Darkice and Icecast, as well as identifying and setting up your audio capture device.

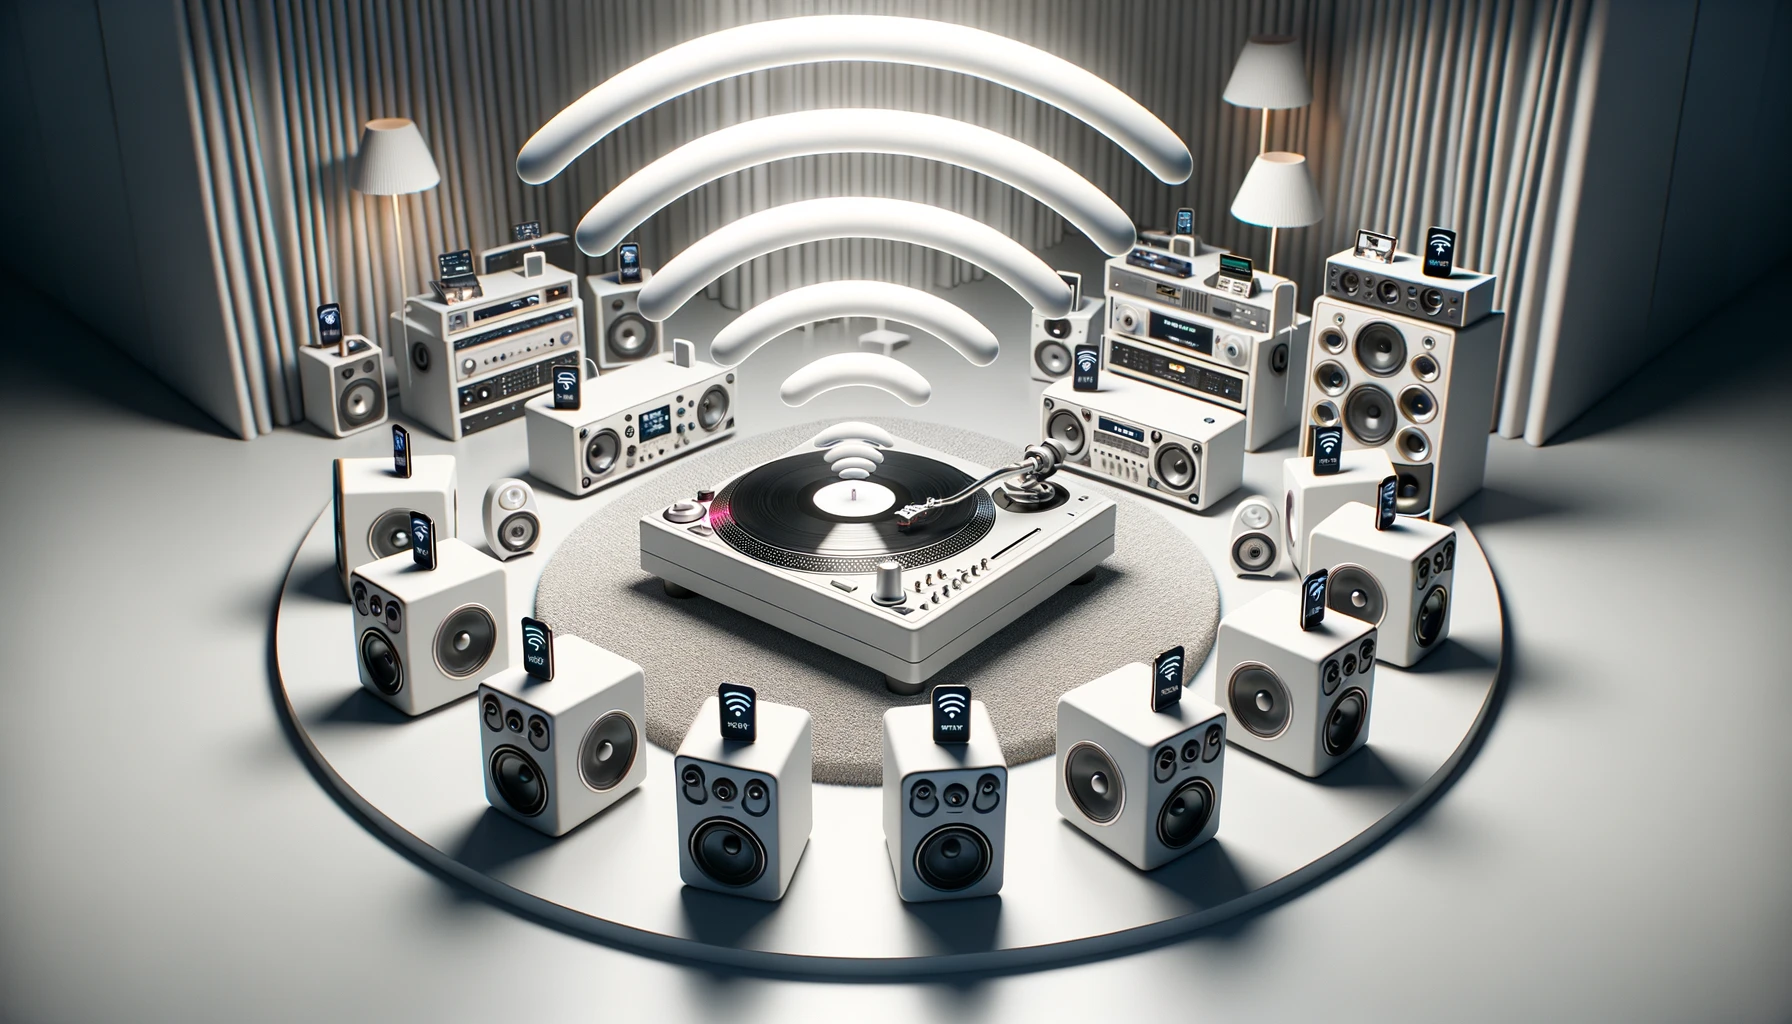
    After that, you will have a stream on your local network which you can access with multiple programs such as iTunes, VLC Player, or Chrome. From these programs, you can also stream your audio to multiple rooms using Google Chrome or AirPlay 2.


    Step-by-Step Guide

    To facilitate capturing and digitizing audio from an analog source and streaming it you are going to have to need a few things.

    Ensure that you have all the prerequisite hardware components mentioned below before proceeding with the setup.

    Step 0: Acquire Hardware

    Audio Capture Device

    If you own an Hi-Fi audio source equipment like an LP record player/turntable that only has analog audio output (.i.e. it does not have an embedded USB audio codec output) then the easiest option is to buy and use an external stand-alone USB Audio Device for analogue-to-digital conversion. These mentioned solutions most often support utilizing a USB Audio Class 2.0 pipeline that can support high-definition audio formats up to 192KHz and 32bits using a standard digital audio interface, however, you need to check the specification before buying the device to make sure it meets your own reqirements.

    Examples of known compatible Audio Capture Device hardware equipment:

    Another option as ADC instead of a USB Audio Device that should technically provide the same function but has not been tested here are HiFiBerry’s ANALOG INPUT products like “HiFiBerry DAC+ ADC PRO”, “HiFiBerry DAC2 ADC PRO”, or “HiFiBerry DAC+ ADC” as input, (which as bonus using HiFiBerry makes the whole build an all-in-one package that could be aesthetically pleasing and almost have the clean look of a commercial appliance):

    Note that not all HiFiBerry boards have been tested as with the Raspberry Pi 5 (so double-check board compatible if that is what you decide to go with):

    - https://www.hifiberry.com/blog/pi5-compatibility-with-hifiberry-products/
    

    Preamplifier (phone preamp)

    Note that some but not all vinyl record players (turntables/phonographs/gramophones) have a built-in preamplifier (also known as a “phono preamp”, “phone stage”, or “RIAA pre-amp”), and even if they do you still often have the option to disable the built-in preamplifier in favor of using an external preamp of higher quality or a other RIAA EQ curve for a different sound.

    If your Hi-Fi audio source equipment does not have a built-in pre-amp for analog output then you either need to buy specifically a USB Audio Device with pre-amp (like one of ones mentioned above) or use a separate high-fidelity preamplifier (RIAA/phono preamp) to put inline between the audio source equipment and the Audio Capture Device, (this preamp stage amplify the very quiet electrical signal generated by the cartridge on your vinyl turntable, as otherwise you will not get a high-quality signal that has been amplified enough to allow good digitalization).

    Examples of known good preamplifier hardware equipment:

    • PHONO PP400

    Tip: If you are into electronics DIY then you can build your own following build instructions from the “Calvin-phono”, “PlatINA”, or RP1 projects:

    Note! Regardless of which preamp you end up using, recommend get and use a galvanicly isolated power-supply or in-line galvanic isolator made for audio in-mind as that prevent ground loop noises and increase sound quality, (works by creating a new ground for the USB device).

    Server:

    • “Raspberry Pi 3 Model B” or a “Raspberry Pi Zero 2 W”
      • Micro SD Card – (8GB is enough for a dedictaed solution).
      • A good quality USB power-supply, (audio applications/equipment can be much more sensitive to power supplies).
        • Optionally: Get an “USB isolator” or a USB power-supply with built-in isolator.
          • Again, as mentioned above under the preamplifier section, galvanicly isolated power-supply or galvanic isolator is recommended for all components to prevent ground loop noises and increase sound quality.

    Step 1: Download

    Download the Raspberry Pi Imager from Raspberry Pi Software.

    Raspberry Pi Software

    Also, download the preconfigured image for your project from GitHub: Download Image.


    Step 2: Configure

    1. Insert your Micro SD card into your computer.
    2. Open the Raspberry Pi Imager.
    • Choose OS: Select “Custom Image” in the dropdown menu. Select the Downloaded preconfigured image.

    • Choose Storage: Select your SD card as the storage destination.

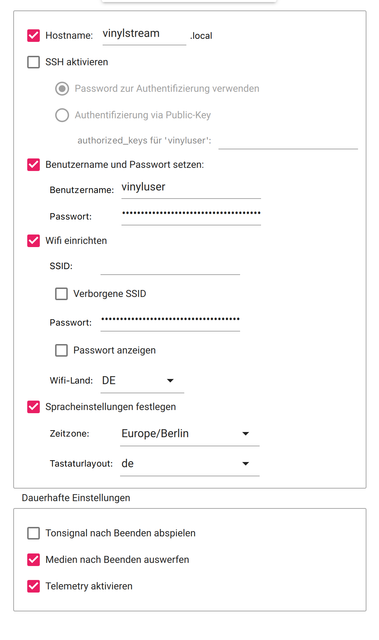
    • Settings: Click on the Settings tab and input the following information:

      • Hostname: vinylstream
      • User: vinyluser # Important: The username must be exactly the same. Also pay attention to uppercase and lowercase letters
      • Password: setyourpassword # Is no longer needed after the easy installation
      • Input your Wi-Fi information.
    1. Save these settings.

    2. Click on “Write” and wait for the process to complete.


    Step 3: Try it Out

    1. Insert the Micro SD card into your Raspberry Pi.
    2. Connect the Raspberry Pi to a power source.
    3. Connect the capture card to the Pi.

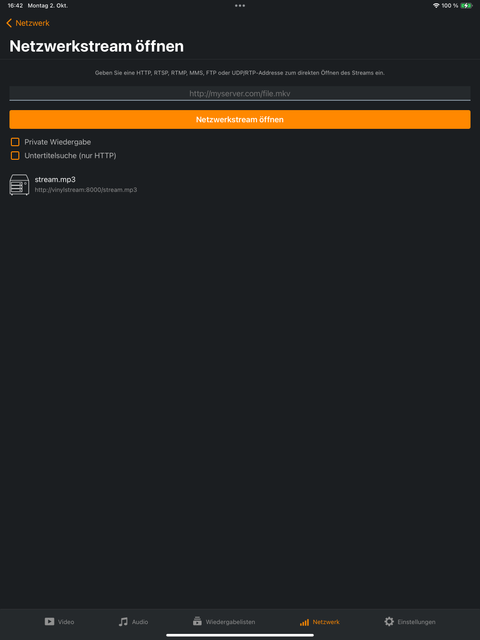
    Wait for 3-5 minutes, then try to open this page in your browser: http://vinylstream:8000/

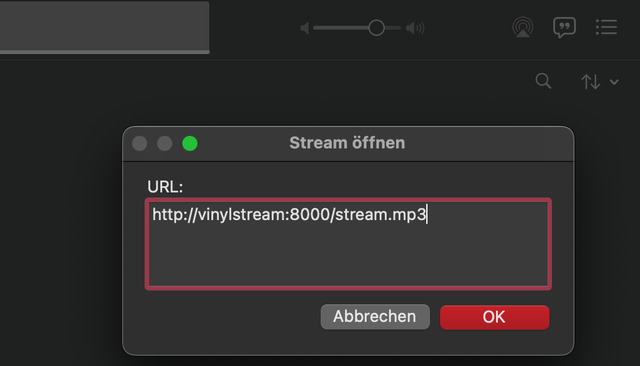
    That’s it! You can now stream your music from http://vinylstream:8000/stream.mp3.

    Here is an example with the VLC App:

    IMG-0749

    And here’s one with iTunes (Music):

    Press inside the iTunes (Music) App: ⌘U (Command U)
    Then type in http://vinylstream:8000/stream.mp3

    Bildschirmfoto-2023-10-02-um-16-40-17 Bildschirmfoto-2023-10-02-um-16-40-56


    Advanced Configuration (if you want to Configure the Raspberry PI yourself)

    Step 1: Identify the Capture Device

    # Lists audio devices
    arecord -l

    Look for the output that identifies your Behringer UCA202. For example:

    **** List of CAPTURE Hardware Devices ****
    card 1: CODEC [USB Audio CODEC], device 0: USB Audio [USB Audio]
    

    Note down the card and device numbers as you will need them for configuration (e.g., hw:1,0).


    Step 4: Test Audio Capture

    # Captures 10 seconds of audio and saves it as test.wav
    arecord -D hw:1,0 -d 10 test.wav

    The command will record 10 seconds of audio from your capture device. Play the test.wav file to check the audio quality. If everything sounds good, proceed with configuring Icecast.

    To manually set the sample rate, you can use:

    # Sets the sample rate and captures 10 seconds of audio
    arecord -D hw:1,0 -d 10 -f S16_LE -r 48000 test.wav

    For the Behringer UCA202 for example, the max sample rate is 48 kHz


    Step 5: Install Darkice and Icecast

    Before we dive into the configuration part, it’s crucial to install and understand the role of two essential software components for this setup: Darkice and Icecast.

    Why Darkice?

    Darkice is a live audio streamer that captures audio from your specified device (in this case, Behringer UCA202) and encodes it into a streamable format. It acts as the bridge between your audio capture device and the Icecast server, capturing audio in real-time and sending it to Icecast for distribution.

    Why Icecast?

    Icecast is a streaming media server that will broadcast the audio stream to listeners. It’s highly configurable and handles multiple clients, allowing you to stream audio to numerous listeners simultaneously. Icecast takes the encoded audio feed from Darkice and makes it accessible over the internet.

    Installation

    If you haven’t installed these yet, you can do so with the following commands:

    For Darkice:

    sudo apt-get install darkice

    For Icecast:

    sudo apt-get install icecast2

    Darkice Configuration

    • Open the Darkice configuration file, usually named darkice.cfg, in a text editor.

      sudo nano /etc/darkice.cfg
    • Insert the configuration code provided in the referenced Git repository. This code typically sets the input device, sample rate, and other parameters tailored for optimum performance with your Behringer UCA202 capture device.

      Note: The Git repository is your go-to source for a sample configuration. Simply copy-paste the code into your darkice.cfg file.


    Starting Darkice

    Without System Service

    If you dont want to set Darkice as a system service, you can manually start it using the custom configuration file:

    # Starts Darkice with the custom configuration file
    darkice -c /path/to/darkice.cfg

    In this case, you will need to run this command each time you wish to start Darkice. Make sure to replace /path/to/darkice.cfg with the actual path to your Darkice configuration file.

    Either method will initiate Darkice, allowing it to capture audio based on the parameters set in your configuration file and send it to the Icecast server for streaming.

    Running as System Services (Optional)

    If you find yourself frequently using Darkice and Icecast, setting them up as system services can automate the startup process and help manage the applications more efficiently.

    To set up Darkice as a system service, you can create a custom systemd service file:

    1. Create a new systemd service file for Darkice.

      sudo nano /etc/systemd/system/darkice.service
    2. Add the following content:

      	[Unit]
      	Description=Darkice live audio streamer
      	After=default.target
      	
      	[Service]
      	ExecStartPre=/bin/sleep 10
      	ExecStart=/usr/bin/darkice -c /etc/darkice.cfg
      	Restart=always
      	User=vinyluser
      	
      	[Install]
      	WantedBy=multi-user.target

      Note: Replace /etc/darkice.cfg with the actual path to your Darkice configuration file and vinyluser with the user you want the service to run as.

    3. Reload the systemd daemon and enable the service.

      sudo systemctl daemon-reload
      sudo systemctl enable darkice

    Starting Icecast

    sudo systemctl start icecast2
    sudo systemctl enable icecast2 # start on boot
    

    Icecast as a System Service

    Icecast usually installs itself as a service by default. If for some reason it isn’t, you can create a custom systemd service file similar to Darkice.

    Final Test

    1. Connect to your stream using a web browser (Chrome) or a streaming app (iTunes / VLC).
    2. Listen to some music

    If all goes well, your quality audio streaming setup is now complete!

    References to other similar projects:

    Visit original content creator repository https://github.com/quebulm/Raspberry-Pi-Vinyl-Streamer
  • netflix-clone

    Netflix Clone

    Netflix Clone

    Build Status Coverage Status Coverage Status

    Preview

    About

    A simple Netflix clone with React JS and Next.js.

    App URL: netflix-app-clone.vercel.app

    Built Using

    Getting Started

    Prerequisites

    You need to install on your machine Node.js or Yarn.

    Installing dependencies

    npm install
    # or
    yarn install

    Project setup

    Compiles and hot-reloads for development

    # start app open development mode
    yarn dev
    # or
    npm run dev
    # start app open development mode with vercel environments
    yarn vercel:dev
    # or
    npm run vercel:dev

    Compiles and minifies for production

    yarn build
    # or
    npm run build
    yarn start
    # or
    npm run start

    Lints and fixes files

    # show errors
    yarn lint
    # or
    npm run lint
    
    # fix errors
    yarn lint:fix
    # or
    npm run lint:fix

    Run your unit tests

    # run tests
    yarn test
    # or
    npm run test
    
    # run tests on watch mode
    yarn test:watch
    # or
    npm run test:watch
    
    # run tests on ci mode
    yarn test:ci
    # or
    npm run test:ci
    
    # run tests on coverage mode
    yarn test:coverage
    # or
    npm run test:coverage
    
    # run tests on coverage with watch mode
    yarn test:coverage:watch
    # or
    npm run test:coverage:watch

    Develop by Eder Sampaio 👋  See my linkedin.

    Visit original content creator repository https://github.com/ederssouza/netflix-clone
  • Dados-Abertos-Eleicoes

    Dados Abertos Eleições

    Repositório para processamento e modelagem dimensional dos dados das eleições utilizando Spark no Databricks Community

    Base de Dados

    A base de dados e sua dicionarização se encontram no link: https://dados.gov.br/dataset/candidatos-2022

    Sobre as camadas

    ERP

    A camada ERP é meramente ilustrativa, utilizada apenas para armazenar os arquivos em seu formato original no qual foram baixados do portal de dados abertos.

    Bronze

    Em camada bronze, os arquivos foram lidos e unidos e salvos em arquivo colunar, neste caso parquet com o objetivo de utilizar sua compressão.

    Silver

    Na camada silver os dados foram limpados e realizados os mais diversos tratamentos para torná-los confiáveis para consumo.

    Gold

    Por fim, em camada gold, os dados foram modelados utilizando modelagem dimensional, fisicalizando tabelas fatos e dimensões.

    Modelagem

    Abaixo são listadas as tabelas fatos e dimensões criadas durante a codificação do projeto.

    Fatos

    • FATO_DESPESAS
    • FATO_PATRIMONIO_CANDIDATO

    Dimensões

    • DM_CALENDARIO
    • DM_CANDIDATO
    • DM_CARGO
    • DM_COLIGACAO
    • DM_COR_RACA
    • DM_ELEICAO
    • DM_ESTADO_CIVIL
    • DM_FEDERACAO
    • DM_GENERO
    • DM_GRAU_INSTRUCAO
    • DM_NACIONALIDADE
    • DM_OCUPACAO
    • DM_PARTIDO
    • DM_SITUACAO_CANDIDATURA
    • DM_TIPO_BEM_CANDIDATO

    Análises

    A seguir, observa-se algumas perguntas que podem ser respondidas através do dados utilizados.

    • Qual o total de despesas por partido?
    • Qual o total de despesas por genêro?
    • Qual o total de despesas por coligação?
    • Qual o total de despesas por ano, mês?
    • Quais estados civis geram mais despesas durante a eleição?
    • Qual a quantidade total de candidatos por ano?
    • Qual a quantidade total de candidatos por partido?
    • Qual a quantidade total de candidatos por ocupação?
    • Qual a quantidade total de candidatos por genêro?
    • Qual a quantidade total de candidatos por federação?
    • Qual a quantidade total de candidatos por UF?
    • Qual a quantidade total de bens por candidato?
    • Qual a quantidade total de bens por partido?
    • Qual a quantidade total de bens por genêro?
    • Qual a quantidade total de bens por grau de instrução?
    • Qual o patrimônio em bens por grau de instrução?
    • Qual o patrimônio em bens por genêro?
    • Qual o patrimônio em bens por ocupação?
    • Qual o patrimônio em bens por candidato?

    Além dessas, torna-se possível realizar a exploração e elaborar outras análises.

    Visit original content creator repository
    https://github.com/AfonsoFeliciano/Dados-Abertos-Eleicoes

  • dotnet-patcher

    Dotnet Patcher

    This repo contains the code to build and test the dotnet-patcher tool.

    Motivations

    I like modding games, and many games are now using .Net as a scripting language.
    It can a home-made solution or just because the game is developped using the
    UnityEngine. I’m also a Linux user. I don’t have any
    Windows machine. So it means that I play on Linux, using
    Steam’s Proton, or Wine
    when the game isn’t natively supported on Linux.

    Some games have official mod support like
    Cities: Skylines. Unfortunately you
    may be quite limited to what you can mod because no extension points are
    provided for everything.

    Some games have unofficial, closed-source, mod loaders like, for example
    Raft, which is using
    RaftModLoader. Unfortunately, it doesn’t play
    well with Linux/Proton. I failed to make it work. Some documentation do mentions
    some step to make it work involving installing it on a Windows, to then copy on
    the Linux. I don’t find this an acceptable workaround. Documentation also
    mentions that it may work better if using the compiler from a Mono installation
    but that would require too much work then it won’t be done. As it’s
    closed-source I can’t contribute to solve the situation.

    Some other games rely on Harmony
    to provide mod support. This is by far the least problematic as it’s a framework
    to patch assemblies. The only issues I have with this it that its a bit complex
    to use. Sometimes I juste want to make a minor change so I don’t want to create
    a full new project, dealing with dependencies, installing Harmony in the game
    and all that stuff just to change two or three opcodes.

    And finally, some other games or applications just don’t have any mod support.
    Technically, I could make it work using Harmony, as it’s supposed to be working
    on any .Net or Mono application. But I still finds it overkill for small
    patching.

    Also, I am disappointed by the Reflexil‘s UI/UX on
    Windows and even more disappointed that there is no Linux’s version of it.
    The AvaloniaILSpy fork is
    crashing very often, it’s UI is full of bugs. It’s a huge beast, relying on
    technologies I dislike (WPF for example), so that I don’t want to get involved
    into it to solve my issues.

    For all these reasons, I created this tool. I aim at making it as lightweight,
    easy to use, portable as possible.

    Dependencies

    This project depends on the following:

    Platform

    As this is written using .Net Core, it should run everywhere this framework is
    available. Including Windows, Linux and Mac OS. Thus being said, I develop and
    test only on Linux. I don’t have any other OS to test, so I may not be able to
    reproduce your issue.

    Build from source

    git clone git@github.com:ctxnop/dotnet-patcher.git
    cd dotnet-patcher
    dotnet build

    Patching an assembly

    Create a class that implement the IPatch interface. It may be located anywhere
    in the project’s folder, but you may want to keep things tidy so put it in the
    Patches folder.

    Rebuild the tool using dotnet build, then you can patch an assembly using the
    following command:

    ./dotnet-patcher/out/net6.0/dp patch <patch-id> <assembly-to-patch>.dll

    Currently, patching an assembly means using Mono.Cecil and requires
    understanding the IL code which is a kind-of assembler. This can be tricky, so
    you probably want to get some help from tools like ILSpy or Reflexil, to check
    what was the original code, what is the patched code, how does it translate from
    C# to IL and vice-versa…

    public bool Apply(AssemblyDefinition asm)
    {
    	asm.Patch(
    		(td) => {
    			// This is a selection predicate: return 'true' to select this TypeDefinition
    			// Called for all TypeDefinition found in the AssemblyDefinition
    			return string.CompareOrdinal(td.FullName, "TypeToPatch") == 0;
    		},
    		(md) => {
    			// This is a selection predicate: return 'true' to select this MethodDefinition
    			// Called for all TypeDefinition selected by the above predicate
    			return string.CompareOrdinal(md.Name, "MethodToPatch") == 0; },
    		(ilp) => {
    			ilp.Clear();			// Remove all previous instructions
    			ilp.Emit(OpCodes.Ret);	// This method will now just return and do nothing.
    		}
    	);
    }

    A very early and incomplete support for C# compilation is added, so that you can
    provide a method’s body code. It will generate a source code corresponding to
    the original but with the code you provided as the method’s body. It will then
    compiles everything into an in-memory assembly using Roslyn. And finally it use
    Mono.Cecil back to read the resulting assembly and replace the original
    intructions with the one founds in the generated assembly.

    When invoking the patch command, a backup of the original assembly is created
    in the same directory, with a .dporg extension. The backup is made only if not
    already existed. Patches are applies on the backup file, so that calling patch
    a second time on the same assembly won’t result in a different patched assembly.
    This means that you can revert any change by restoring the backup.

    Visit original content creator repository
    https://github.com/ctxnop/dotnet-patcher

  • bittrex-node-client

    Bittrex Node Client

    This is a browser-client application used for trading in the bittrex exchange. You’ll need to have nodejs installed on your machine to run this client

    This application uses the node package node.bittrex.api

    If you have any questions or feedback – I can be contacted at luis@devluismiranda.com

    This Library is licensed under the MIT license.

    Before you start

    Keep in mind that this client’s purpose is for trading in the bittrex exchange; so, be thoughtful and take the time to understand how to use this application before you start trading.

    • In order to start trading, make sure that you create an api key in bittrex with the following permissions:

    image

    Notes to run the client

    • Make sure that the node server is running to serve the files to the browser. All supporting files (bootstrap,jquery, etc) are served to the client from the node_modules folder

    • When the page is loaded for the first time, click on ‘Update Settings’ and enter the api key and secret key to start trading – this information is only maintained in the browser local storage. Make sure to keep this information safe, in case the data is loss and needs to be re-entered.

    • After updating the settings for the first time, refresh the page to reconnect to the server with the api information – this only needs to be done when the api info is entered, from thereon, it’ll be loaded from the local storage

    Visit original content creator repository https://github.com/lems111/bittrex-node-client
  • sarcasm-detection

    Detecting Target of Sarcasm Using Ensemble Methods

    Code related to the ALTA’s 2019 Shared Task – “Detecting Target of Sarcasm using Ensemble Methods”. Our work was presented in ALTA 2019
    The 17th Annual Workshop of the Australasian Language Technology Association

    The link to the paper can be found -> http://bit.do/pradalta

    What’s this Read Me about ?

    Basically , it is to give you an overview on what is this project about. Keep in mind that I’ve built this very quick and dirty way. It is not in the best shape but I am trying to make sure that at least people can download it and make it easier for them to download and use it

    Requirements

    • python 3.7
    • numpy
    • sckikit-learn
    • pandas
    • ALTA 2019 Shared Data Challenge Dataset (Please kindly obtain for them)

    Will update with pip requirements.txt so that you can have the exact one. I will make it easier for you all :). At the moment , I apologize – you just need to go through the files for the imports and install the pip To make your life a bit easier , the major imports or the stuff that I use can be found in the following files below 🙂

    What are the files for

    • DoItAll.py – It runs the rule-based system. Just load the CSV file with the title on the target. It will pick it up and get back to you
    • LinearRegressionClassifer.py – The main linear regresson. You can take a look at the parameters that were used and also the way how we load the embeddings (.npy which was used from Google Sentence Encoder)
    • lstm.py – This to generate the word embeddings – “Universal Sentence Encoder” . I should rename it , but this shows how you can quickly transform it
    • rule_weighting.py – Our genetic algorithim in optimizing the weightages for it
    • rules_implement.py – The rules from Joshi et al (2018) with our modifications. The original methods are still kept so that you may able to reproduce it

    Problems Running ?

    Raise an Issue or Reach out to me – I can help. Again it’s my first time of publishing some public project. I try to follow best practices , so please pardon me if there are mistakes

    TO-DO

    • Improve the Read Me
    • Refactor the Code – some of the file names do not even make sense or even the method. It can be optimized further
    • Add PIP Requirements
    • Publish Jupyter-Notebook (to help people step-by-step and explain it to them)
      QUICK and DIRTY INFO

    Visit original content creator repository
    https://github.com/prasys/sarcasm-detection

  • yii2-migrik

    Migration Generator

    Latest Stable Version Total Downloads License

    • generate migration files (not dumps!) with indexes, and foreign keys, for one table, comma separated list of tables, by part of table name, for all tables by
    • generate migrations based on table data – in two ways – as batchInsert Query or as insert via model
    • generate migrations based on PHPDOC and model properties

    Installation

    NOTE : Use 2.x versions for yii <=2.0.13

    The preferred way to install this extension is through composer.

    Either run

    composer require --dev --prefer-dist insolita/yii2-migration-generator:~3.1
    

    or add

    "insolita/yii2-migration-generator": "~3.1"
    

    to the require-dev section of your composer.json file.

    Just install, go to gii and use (By default composer bootstrap hook)

    ANNOTATION SYNTAX

    In general the syntax of column definitions is based on style of yii-migration, only separated by “|” and provide a little more opportunities for reducing code

    • as you see in examples – empty brackets not necessary
    • also shortcut expr() will be replaced to defaultExpression() and default() to defaultValue

    You can add annotations in your model(not necessary AR or yii\base\Model or Object or stdClass)

    @db (db2) – specify connection id required for migration ‘db’ – by default”

    @table ({{%my_table}})– specify table for migration”

    Supported column annotations:

    • As separate annotation above class or above current variable
    /**
    * @column (name) string|notNull|default('SomeValue')
    */
    • As addition to @property or @var definition
       /**
        * @var int $id @column pk()
        */
       public $id;
       /**
        * @var string $route @column string(100)|notNull()
        */
       public $route;
    
    
    /**
     * @property integer    $id         @column pk|comment("Id")
     * @property string     $username   @column string(100)|unique|notNull|default("Vasya")
     * @property string     $email      @column string(200)|unique()|defaultValue("123@mail.ru")
     * @property string     $password   @column string(200)|notNull|expr(null)
     * @property string     $created_at @column string(200)|notNull|expr('CURRENT_TIMESTAMP')
     */
    class TestModel extends ActiveRecord{
    

    Customizing

    Use Own templates

    Copy default templates from folders

    vendor/insolita/yii2-migration-generator/gii/default_structure //schema migrations

    vendor/insolita/yii2-migration-generator/gii/default_data //data migrations

    to some project directory, for example

    @backend/gii/templates/migrator_data;

    @backend/gii/templates/migrator_schema;

    Change gii configuration like this

    $config['modules']['gii'] = [
        'class' => 'yii\gii\Module',
        'allowedIPs' => ['127.0.0.1', 'localhost', '::1'],
        'generators' => [
            'migrik' => [
                'class' => \insolita\migrik\gii\StructureGenerator::class,
                'templates' => [
                    'custom' => '@backend/gii/templates/migrator_schema',
                ],
            ],
            'migrikdata' => [
                'class' => \insolita\migrik\gii\DataGenerator::class,
                'templates' => [
                    'custom' => '@backend/gii/templates/migrator_data',
                ],
            ],
        ],
    ];
    Use own resolver for definition of columns
    • create new class, inherited from \insolita\migrik\resolver*ColumnResolver
      • override required methods, or create methods for exclusive columns based on database types – see insolita\migrik\resolver\BaseColumnResolver resolveColumn() phpdoc and realization
    Use own resolver for definition of indexes or relations
    • create new class, inherited from \insolita\migrik\resolver\TableResolver
    • in bootsrap your apps add injection

    \Yii::$container->set(IMigrationTableResolver::class, YourTableResolver::class);

    Visit original content creator repository https://github.com/Insolita/yii2-migrik
  • DSA-Bootcamps

    DSA-Bootcamps

    DSA-Bootcamps is a initiative by Code Dazzlers to help students in problem solving. Here you will going to solve 200++ problems in the span of 6 week from all DSA topics.

    1. All session will be live on Google Meet.
    2. If you miss the live session, you can checkout the recorded session at our youtube channel.
    3. You can find all Assigments here.

    Contribution Guidelines🏗

    1. Fork this repository.

    2. Clone your forked copy of the project.

    git clone https://github.com/<your_user_name>/DSA-Bootcamps.git
    

    3. Navigate to the project directory 📁 .

    cd DSA-Bootcamps
    

    4. Add a reference(remote) to the original repository.

    git remote add upstream https://github.com/codedazzlers/DSA-Bootcamps.git
    

    5. Check the remotes for this repository.

    git remote -v
    

    6. Always take a pull from the upstream repository to your master branch to keep it at par with the main project(updated repository).

    git pull upstream main
    

    7. Perfom your desired changes to the code base.
    Make Changes in your named folder only.

    8. Track your changes:heavy_check_mark: .

    git add . 
    

    9. Commit your changes .

    git commit -m "Topic Done"
    

    10. Push the committed changes in your feature branch to your remote repo.

    git push 
    

    11. To create a pull request, click on compare and pull requests.

    12. Add appropriate title and description to your pull request explaining your changes and efforts done.

    13. Click on Create Pull Request.

    14. Voila ❗ You have made a PR to the DSA-Bootcamps 💥 . Wait for your submission to be accepted and your PR to be merged.

    Visit original content creator repository
    https://github.com/codedazzlers/DSA-Bootcamps

  • algorithm

    algorithm

    목차

    자주 하는 실수

    학습내용

    2020

    Dynamic Programming; DP

    약수 구할 때

    벨만 포드 알고리즘, 다익스트라 알고리즘

    플로이드 와샬 알고리즘

    트리의 지름 (임의의 두 노드 중 가장 먼 노드 길이)

    Union-find (합집합 찾기)

    자주 하는 실수

    • dp 문제에서 경로를 기록해야할때

      • 새로 기록하는 dp에 이전경로 전체를 포함하는 경로가 아닌… 바로 이전 위치만을 표기하는 것이 보통 더 좋다. 출력할때 는 역추적하여 출력하면 됨

    학습내용:

    2020년

    Dynamic Programming; DP

    특정 범위까지의 값을 구하기 위해서 그것과 다른 범위까지의 값을 이용하여 효율적으로 값을 구하는 알고리즘 설계 기법이다.

    조금 장난스럽게 말해서 답을 재활용하는 거다. 앞에서 구했던 답을 뒤에서도 이용하고, 옆에서도 이용하고…엄밀히 말해 동적 계획법은 구체적인 알고리즘이라기보다는 문제해결 패러다임에 가깝다. 동적 계획법은 “어떤 문제를 풀기 위해 그 문제를 더 작은 문제의 연장선으로 생각하고, 과거에 구한 해를 활용하는” 방식의 알고리즘을 총칭한다.

    DP알고리즘- LIS알고리즘(+LCS)알고리즘

    #include<vector>
    //LIS알고리즘
    int main() {
    	vector<int> v;
    	int N; //N수열 갯수
    	cin >> N;
    	int k;
    	for (int i = 0; i < N; i++) {
    		cin >> k; //수열을 하나씩
    		auto it = lower_bound(v.begin(), v.end(), k);
            // 알맞은 자리 찾기
    			*it = k;
    	}
    	cout << v.size() << '\n';	
    }
    //LCS 알고리즘
    for (int i = 1; i <= len1; i++) {
    		
    		for (int j = 1; j <= len2; j++) {
    			if (str1[i - 1] != str2[j - 1]) {
    				DP[i][j] = max(DP[i - 1][j], DP[i][j - 1]);
    			}
    			else {
    				DP[i][j] = DP[i - 1][j - 1] + 1;
    			}
    		}
    	}
    	cout << DP[len1][len2] << '\n';


    이차원 배열 , 배열을 이용해서 이전값,과 계속 비교해서 최적의 값을 찾는 DP

    약수 구할때

    • vector<int> v;
      for(int i=1; i<=n ;i++){
          if(n % i ==0)
              v.push_back(i);
      } //이런 식으로 구하는 것 보다
      for (int i = 2; i * i <= g; i++)
      		if (!(g % i)) {
      			ans.push_back(i);
      			if (i != g / i) ans.push_back(g / i);
      		}//이렇게 하고 필요하면 sort로 정렬하는것이 한참 빠르다
      
    • 유클리드 호제법 – 두 수의 최대 공약수 구하기

      • int gcd(int a, int b)
        {
        	return b ? gcd(b, a%b) : a;
        }
        
        int gcd(int a, int b)
        {
            int c;
        	while(b)
        	{
        		c = a % b;
        		a = b;
        		b = c;
        	}
            return a;
        }
        

    이항정리

    페르마 소정리

    피보나치수 피사노주기(피보나치수의 어떠한 수에 나머지는 일정주기가 있음 생각해 보면 당연한 것 )

    p(n)= abc,p(n+1)=abc+1 일때

    p(n*자연수+ i )%abc= p(i)% abc= p(i) 일것.

    벨만 포드 알고리즘, 다익트라알고리즘

    • 다익트라 알고리즘

      • 매번 방문하지 않은 노드 중에서 최단 거리가 가장 짧은 노드를 선택합니다.
      • 음수 간선이 없다면 최적의 해를 찾을 수 있습니다.
    • 벨만 포드 알고리즘

      • 매번 모든 간선을 전부 확인합니다.
        • 따라서 다익스트라 알고리즘에서의 최적의 해를 항상 포함합니다. 시간복잡도는 더 높음
      • 다익스트라 알고리즘에 비해서 시간이 오래 걸리지만 음수 간선 순환을 탐지 할 수 있습니다.

    import sys
    input =sys.stdin.readline
    INF= int(1e9)  #무한을 의미하는 값으로 10억을 설정
    
    def bf(start):
        # 시작 노드에 대해서 초기화
        dist[start]=0
        # 전체 n번의 라운드(round)를 반복
        for i in range(n):
            # 매 반복마다 "모든 간선"을 확인하며
            for j in range(m):
                cur=edges[j][0]
                next_node= edges[j][1]
                cost= edges[j][2]
                # 현재 간선을 거쳐서 다른 노드로 이동하는 거리가 더 짧은 경우
                if dist[cur] != INF and dist[next_node] > dist[cur] +cost:
                    dist[next_node]=dist[cur]+cost
                    # n 번째 라운드에서도 값이 갱신 된다면 음수 순환이 존재
                    if i== n - 1:
                        return True
        return False
    
    # 노드의  개수, 간선의 개수 입력받기
    n,m=map(int, input().split())
    # 모든 간선에 대한 정보를 담는 리스트 만들기
    edges= []
    # 최단 거리 테이블을 모두 무한으로 초기화
    dist=[INF] * (n + 1)
    
    # 모든 간선 정보를 입력 받기 
    for _ in range(m):
        a, b, c = map(int, input().split())
        # a번 노드에서 b번 노드로 가는 비용이 c라는 의미
        edges.append((a,b,c))
        
    # 벨만 포드 알고리즘을 수행
    negative_cycle = bf(1) # 1번 노드가 시작노드
    if negative_cycle:
        print("-1")
    else:
        # 1번 노드를 제외한 다른 모든 노드로 가기 위한 최단 거리 출력
        for i in range(2,n+1):
            # 도달할 수 없는 경우, -1을 출력
            if dist[i] ==INF:
                print("-1")
           	# 도달할 수 있는 경우 거리를 출력
            else:
                print(dist[i])
             

    플로이드 와샬 알고리즘

    모든 정점에서 다른 모든 정점으로의 최단경로를 찾는 알고리즘

    이차원 배열로 각 정점에서 각정점으로가는 최단거리 초기화 후, 각 정점을 지난다고 가정하여 반복문

    코드

    # 백준 11404 플로이드
    
    import sys
    input =sys.stdin.readline
    INF= int(1e9)  #무한을 의미하는 값으로 10억을 설정
    
    def floydWarshall():
        # k = 거쳐가는 노드
        for k in range(1,n+1):
            # i= 출발 노드
            for i in range(1,n+1):
                # j = 도착 노드
                for j in range(1,n+1):
                    if edges[i][k]+edges[k][j] <edges[i][j]:
                        edges[i][j]= edges[i][k]+edges[k][j] 
    
    # 노드의 개수, 간선의 개수 입력
    n= int(input())
    m= int(input())
    # 경로 배열 
    edges=[[INF]*(n+1) for _ in range(n+1)]
    
    for _ in range(m): #같은 노선 다른 경로 존재
        a,b,c=map(int,input().split())
        edges[a][b]=min(edges[a][b],c)
    for i in range(1,n+1): # 같은 노드 끼리 0
        edges[i][i]=0
    
    floydWarshall() 
    
    # 값 출력
    for i in range(1,n+1):
        for j in range(1,n+1):
            if edges[i][j] !=INF:
                print(edges[i][j],end=' ')
            else:
                print(0,end=' ')
        print()

    다시 상기시키는 다익스트라(+경로)

    # baek11779 최소비용 구하기2 
    
    import sys
    
    input=sys.stdin.readline
    
    n=int(input())
    m=int(input())
    
    INF =int(1e9)
    
    # 입력 ,변수 초기화
    edges=[[INF for i in range(n+1)]for _ in range(n+1)]
    for _ in range(m):
        a,b,c= map(int,input().split())
        edges[a][b]= min(c,edges[a][b])     # 경로가 같은데 비용이 다른 것 있다는 언급이 없었지만 생각했어야..
    start_city,end_city=map(int,input().split())
    
    costs=[INF for i in range(n+1)]         # 다익스트라 start_city에서의 거리 배열
    parents=[0 for i in range(n+1)]         # 경로 추적용 이전위치
    visitied=[False for i in range(n+1)]
    
    def find_lowest_cost_node(costs):       # 다익스트라 최단거리 찾는 함수
        lowest_cost=INF
        lowest_cost_node=None
        for node in range(len(costs)):
            cost= costs[node]
            if cost<lowest_cost and visitied[node]==False:
                lowest_cost=cost
                lowest_cost_node=node
        return lowest_cost_node    
    
    # 다익스트라
    node = start_city
    costs[start_city]=0
    visitied[start_city]=True
    while node is not None:
        cost= costs[node]
        neighbors=edges[node]
        for i in range(len(neighbors)):
            new_cost=cost+neighbors[i]
            if costs[i]> new_cost: # 현재 가지고 있는 cost보다 최단 거리 라면
                costs[i]=new_cost
                parents[i]=node
        visitied[node]=True
        node = find_lowest_cost_node(costs)
    
    print(costs[end_city])
    
    trace=[]
    current=end_city
    while current != start_city:
        trace.append(current)
        current=parents[current]
    trace.append(start_city)
    trace.reverse()
    print(len(trace))
    for i in trace:
        print(i,end=' ')
    

    트리의 지름 (임의의 두 노드 중 가장 먼 노드 길이)

    # baek1167 트리의 지름
    # 트리의 지름을 구하는 방법은 정해져있다. 
    # 먼저 임의의 정점부터 모든 정점까지의 거리를 구하여 
    # 가장 먼 거리를 가진 정점을 구한다. 
    # 그 후에 그 정점으로부터 모든 정점까지의 거리를 다시 구해서 
    # 그 거리들 중 가장 먼 값이 트리의 지름이 된다.
    
    import sys
    input=sys.stdin.readline
    # input
    v = int(input())
    
    # variable init
    edge=[[] for _ in range(v+1)]
    visited=[False for _ in range(v+1)]
    
    maxIndex=0          # 최대 값 index
    maxDistance=0       # 최대 값
    
    def dfs(node ,cost):        #dfs함수
        global maxDistance
        global maxIndex
        if visited[node] != False:  #첫 방문 시에만 진행
            return
        
        if maxDistance < cost:  # 최대값 설정
            maxDistance = cost
            maxIndex =node
        
        visited[node] =True        # 방문 설정
    
        for next,dis in edge[node]: # 연결된 노드 dfs
            dfs(next,cost+dis)
    
        
    # input
    for i in range(1,v+1):      
        temp=input().split()
        for j in range(1,len(temp)-1,+2):
            edge[i].append([int(temp[j]),int(temp[j+1])])
    
    
    # 임의의 노드(1)에서 dfs(bfs)수행 후 
    dfs(1,0)
    # 가장 먼 노드에서 다시 dfs(bfs)수행 하면
    for _ in range(v+1): visited[_]=False
    dfs(maxIndex,0)
    # 이때 나온 최장 거리가 트리의 지름
    print(maxDistance)

    파이썬의 재귀함수최대는 1000

    재귀함수를 사용할 때 ,맞는 거 같은데 이상하게 런타임 에러가 발생할 때는 sys.setrecursionlimit(10**9)

    을 이용해 재귀함수 제한을 늘려서 시도

    Union_find (합집합 찾기)

    재귀를 이용하여 – 이것도 재귀 깊이 제한을 늘려야한다

    # baek1717 집합의 표현
    
    import sys
    input=sys.stdin.readline
    sys.setrecursionlimit(10**9)
    
    n,m=map(int,input().split())
    arr=[-1 for _ in range(n+1)]
    parent=[_ for _ in range(n+1)]
    
    def getParent(parent,x):    # 부모 노드를 찾는 함수
        if parent[x]==x : return x
        parent[x]=getParent(parent,parent[x])
        return parent[x]
    
    
    def unionParent(parent,a,b):# 두 부모 노드를 합치는 함수
        a= getParent(parent,a)
        b= getParent(parent,b)
        if a<b: parent[b]=a
        else : parent[a]=b
    
    def checkUnion(parent,a,b): # 두 노드가 같은 부모노드를 가지는지 확인하는 함수
        a= getParent(parent, a)
        b= getParent(parent, b)
        if a==b: return True
        return False
    
    for _ in range(m):
        check,a,b=map(int,input().split())
        if check==0:
            unionParent(parent,a,b)
        elif check ==1:
            if checkUnion(parent,a,b):
                print("YES")
            else:
                print("NO")

    크루스칼 알고리즘

    가장 가중치가 낮은 간선부터 정렬하여 union find를 사용하여 연결되어 있지 않은 집합끼리 간선 연결, 모든 정점이 연결되면 종료

    # baek1197 최소 스패닝 트리
    from collections import deque
    import sys
    input=sys.stdin.readline
    sys.setrecursionlimit(10**9)
    
    # union-find 함수들
    def getParent(parent,x):    # 부모 노드를 찾는 함수
        if parent[x]==x : return x
        parent[x]=getParent(parent,parent[x])
        return parent[x]
    
    
    def unionParent(parent,a,b):# 두 부모 노드를 합치는 함수
        a= getParent(parent,a)
        b= getParent(parent,b)
        if a<b: parent[b]=a
        else : parent[a]=b
    
    def checkUnion(parent,a,b): # 두 노드가 같은 부모노드를 가지는지 확인하는 함수
        a= getParent(parent, a)
        b= getParent(parent, b)
        if a==b: return True
        return False
    # union-find 함수들
    
    # input
    v,e=map(int,input().split())
    parent=[ _ for _ in range(v)]
    edges=[]
    for _ in range(e):
        a,b,c=map(int, input().split())
        edges.append([c,a-1,b-1])
    
    edges=sorted(edges) # 정렬 후
    
    cnt= 0              # 현재 연결된 정점 갯수 확인을 위한
    total_weight=0      # 최소 가중치 합 
    for weight,a,b in edges:    # 정렬된 간선으로 반복문
        if not checkUnion(parent,a,b):  # 현재 간선의 두 정점이 연결되어 있지 않으면
            total_weight+=weight        # 최소 가중치 합에 포함
            cnt+=1
            unionParent(parent,a,b)     # 연결되었음을 union-find 기법으로
            if cnt>=v-1:                # 모두 연결되엇으면-종료
                break
    
    print(total_weight)         # 결과 출력

    KMP(knuth-Morris-Pratt)

    문자열 매칭 알고리즘

    반복되는 연산을 얼마나 줄일 수 있는지 판별

    -접두사와 접미사가 일치하는 최대 길이를 찾는것!

    길이 문자열 최대 일치 길이
    1 a 0
    2 ab 0
    3 aba 1
    4 abac 0
    5 abaca 1
    8 abacaaba 3

    접두사 접미사를 구하면 일치하는경우에 점프를 수행 할 수있다는 점에서 효율적

    def makeTable(pattern):
        patternSize=len(pattern)
    	arr =[0 for _ in range(patternSize)]
        j=0
        for i in range(patternSize):
            while(j>0 and pattern[i] != pattern[j]):
                j=table[j-1]
            if pattern[i]==pattern[j]:
                j+=1
                table[i]= j
        return table


    최종 코드

    # baek1786 찾기
    import sys
    # readline 쓰면 뒤에 엔터 떼줘야 해서 기본 input 사용
    
    def makeTable(pattern):  # 접두 접미 겹치는거 찾는 함수
        patternSize=len(pattern)
        table = [0  for _ in range(patternSize)]
        j=0
        for i in range(1,patternSize):  # 
            while j>0 and pattern[i] != pattern[j]:
                j=table[j-1]
            if pattern[i]==pattern[j]:
                j+=1
                table[i]= j
        return table
    # input
    T=str(input())
    P=str(input())
    lenT=len(T)
    lenP=len(P)
    # 테이블
    table=makeTable(P)
    answer=[]
    
    # KMP 구문
    j =0
    for i in range(lenT):           # T 문장 처음부터 끝까지 비교
        while j>0 and T[i] != P[j]: # 앞에 한자리 이상 같고 이번자리가 다를 떄
            j= table[j-1]           # j를 0에서 겹치는 부분만큼 jump해서 다시 비교
        if T[i] == P[j]:        # 일치하면
            if j== lenP-1:      # P와 전부 일치하면 
                j= table[j]     # 다음 체크에 Jump
                answer.append(i-lenP+2) # 값 기록
            else:
                j+=1
    # 출력
    print(len(answer))
    print(*answer)

    또한 반복되는 문자열 찾기에도 사용가능

    Trie

    탐색속도에 특화된 알고리즘으로 저장공간을 더 사용하지만 일반 문자열에서 탐색보다 빠르다

    # baek14725 trie 풀이 
    import sys
    input= sys.stdin.readline
    
    class Node:
        def __init__(self,key):
            self.key=key
            self.child=dict()
    
    class Trie:
        def __init__(self):
            self.head=Node(None)
    
        def insert(self, word):
            cur =self.head
    
            for ch in word:
                if ch not in cur.child:
                    cur.child[ch]=Node(ch)
                cur = cur.child[ch]
            cur.child['*']=True
    
    def print_trie(l,cur):
        if '*' in cur.child:
            return
        sorted_child=sorted(cur.child)
        
        for c in sorted_child:
            print("--"*l, end='')
            print(c)
            print_trie(l+1,cur.child[c])
        
    trie=Trie()
    
    for _ in range(int(input())):
        foods = input().split()
        k= int(foods.pop(0))
    
        trie.insert(foods)
    
    cur =trie.head
    print_trie(0,cur)

    Sparse Table-희소 테이블

    • 어떤 작업(예제에서는, 앞으로 한 칸 가기)을 여러 번 반복해야 할 때, 이를 빠르게 처리할 수 있게 해 줍니다.
    • 하나의 값을 채우기 위해서, table을 두 번 연속으로 참조하는 과정이 들어갑니다.
    • 정점이나 원소의 개수(N)뿐만 아니라, 반복할 횟수(K)가 시간·공간복잡도에 들어갑니다.
      만약 이 K가 20, 30 하는 정도로 굉장히 작다면 sparse table의 크기도 굉장히 작아지고, 사실 쓸 필요가 없을 수도 있습니다.
      반대로 K가 굉장히 커져서 2^64까지도 간다면 sparse table의 크기도 커집니다. *“어차피 log를 붙이면 64배밖에 안 되는 거 아냐?”* 하고 생각하실 지도 모르지만, N=500,000 (50만)인 경우에 (64·N)짜리 int 배열의 크기는 122 MiB나 됩니다. 메모리 제한이 빡빡하다면 어려울 지도 몰라요.
    • 기록 대상을 미리 알고 있어야 하며, 중간에 바뀌면 안 됩니다. 예를 들어 한 화살표가 바뀌면, 그로 인해 배열 전체를 갈아엎고 새로 계산해야 할 지도 모릅니다. 그러면 전처리(preprocessing)를 해놓은 의미가 없죠.

    # baek17435 합성함수와 쿼리
    
    import sys
    import math
    input=sys.stdin.readline
    
    m=int(input())
    arr= [0]+list(map(int,input().split()))
    MAXLOG2=int(math.log2(500002) +1)
    sparseTable= [[0 for col in range(m+1)] for row in range(MAXLOG2)]
    
    for i in range(1,m+1):
        sparseTable[0][i]=arr[i]
    
    
    for i in range(1,MAXLOG2):
        for j in range(1,m+1):
            sparseTable[i][j]=sparseTable[i-1][sparseTable[i-1][j]]
    
    
    q= int(input())
    for _ in range(q):
        n,x=map(int,input().split())
        cur=x
        for i in range(MAXLOG2,-1,-1):
            if n & (1<<i):
                cur=sparseTable[i][cur] # 2^i 만큼 이동
        print(cur)
    	

    최소 공통조상 LCA 문제

    중복되는 값들의 연산을 희소테이블로

    # baek11438 LCA2
    
    import sys
    from math import log2
    from collections import deque
    input=sys.stdin.readline
    
    n=int(input())
    logN=int(log2(n)+1)
    tree =[[] for _ in range(n+1)] # 각노드의 연결 노드
    for _ in range(n-1):
        a,b=map(int,input().split())
        tree[a].append(b)
        tree[b].append(a)
    
    p_list=[0 for _ in range(n+1)]  # 부모노드 저장
    depth=[0 for _ in range(n+1)]   # 부모노드 개수
    
    visited=[False for _ in range(n+1)] # dfs 방문
    
    q=deque()
    q.append(1) # 루트
    while q:
        p=q.popleft()
        visited[p] =True
        for i in tree[p]:
            if not visited[i]:
                q.append(i)
                p_list[i]=p
                depth[i]=depth[p]+1
    
    # 2^k 번쨰 부모노드 저장
    # log2 1000000 
    dp=[[0 for _ in range(logN)] for i in range(n+1)] # dp[a][b] a의 2^b 번째 부모노드
    
    for i in range(n+1):
        dp[i][0]=p_list[i]
    
    for j in range(1,logN): # 희소 테이블 설정
        for i in range(1,n+1):
            dp[i][j]=dp[dp[i][j-1]][j-1]
    
    m= int(input())
    for _ in range(m):
        a,b=map(int,input().split())
        if depth[a]>depth[b]:
            a,b=b,a
        # 둘의 레벨 차이
        dif =depth[b]-depth[a]
        for i in range(logN):
            if dif&(1<<i):
                b=dp[b][i]
                
        if a==b:    # 같으면 출력
            print(a)
            continue
        for i in range(logN-1,-1,-1): # 루트 부터 내려가다가 처음달라지는 순간 노드의
            if dp[a][i] != dp[b][i]:
                a=dp[a][i]
                b=dp[b][i]
        print(dp[b][0])     # 바로 부모노드가 정답

    위에랑 비슷한데 복잡해져서인지 계속 틀리고 실수하고 – 한달뒤 풀어보자 (2020.12.30)

    # baek3176 도로 네트워크
    
    import sys
    from math import log2
    from collections import deque
    input=sys.stdin.readline
    
    n=int(input())
    logN=int(log2(n)+1)
    tree =[[] for _ in range(n+1)] # 각노드의 연결 노드
    for _ in range(n-1):
        a,b,c=map(int,input().split())
        tree[a].append([b,c])
        tree[b].append([a,c])
    
    p_list=[[0,0] for _ in range(n+1)]  # 부모노드 저장
    depth=[0 for _ in range(n+1)]   # 부모노드 개수
    
    visited=[False for _ in range(n+1)] # dfs 방문
    
    q=deque()
    q.append(1) # 루트
    visited[1] =True
    while q:
        p=q.popleft()
        for i,d in tree[p]:
            if not visited[i]:
                q.append(i)
                p_list[i][0]=p
                p_list[i][1]=d
                visited[i] = True
                depth[i]=depth[p]+1
    
    # 2^k 번쨰 부모노드 저장
    # log2 1000000 
    dp=[[[0,0,0] for _ in range(logN)] for i in range(n+1)] 
    # dp[a][b] =[a의 2^b 번째 부모노드,a부터 그 부모노드까지의 최소도로,최장 도로]
    
    for i in range(n+1):    # 
        dp[i][0][0]=p_list[i][0]
        dp[i][0][1]=p_list[i][1]
        dp[i][0][2]=p_list[i][1]
    
    
    for j in range(1,logN): # 희소 테이블 설정
        for i in range(1,n+1):
            dp[i][j][0]=dp[dp[i][j-1][0]][j-1][0]
            dp[i][j][1]=min(dp[i][j-1][1],dp[dp[i][j-1][0]][j-1][1])
            dp[i][j][2]=max(dp[i][j-1][2],dp[dp[i][j-1][0]][j-1][2])
    
    m= int(input())
    for _ in range(m):
        a,b=map(int,input().split())
        if depth[a]>depth[b]:
            a,b=b,a
        # 둘의 레벨 차이
        dif =depth[b]-depth[a]
        shortest = 1000000
        longest = 0
        for i in range(logN):
            if dif&(1<<i):
                shortest=min(shortest,dp[b][i][1])
                longest=max(longest,dp[b][i][2])
                b=dp[b][i][0]
                
        if a==b:    # 같으면 출력
            print(shortest,longest)
            continue
        
        for i in range(logN-1,-1,-1): # 루트 부터 내려가다가 처음달라지는 순간 노드의
            if dp[a][i][0] != dp[b][i][0] and dp[a][i][0] != 0 and dp[b][i][0] !=0:
                shortest=min(shortest,dp[a][i][1],dp[b][i][1])
                longest=max(longest,dp[a][i][2],dp[b][i][2])
                a=dp[a][i][0]
                b=dp[b][i][0]
                
        # 경로에 최소 공통조상밑의 경로까지 포함
        shortest=min(shortest,dp[a][0][1],dp[b][0][1])
        longest=max(longest,dp[a][0][2],dp[b][0][2])
    
    
        print(shortest,longest)# 결과

    강한 결합요소 Strongly Connected Component

    방향그래프에서 서로에게 갈 수 있는 정점들을 찾는 알고리즘

    -타잔 알고리즘: dfs를 정점마다 써서 체크

    # baek2150 Strongly Connected Component
    import sys
    from collections import deque
    input=sys.stdin.readline
    sys.setrecursionlimit(10**9)
    
    v,e =map(int,input().split())
    edges=[[] for _ in range(v+1)]
    for _ in range(e):
        a,b = map(int, input().split() )
        edges[a].append(b)
        
    visited=[0 for _ in range(v+1)]
    finished=[False for _ in range(v+1)]
    
    stack=[]
    id = 0
    SCC=[]
    def dfs(node ):
        global id
        id += 1
        visited[node]= id  # node 별 dfs 순서 정의를 위해  0이면 아직 미 방문
        stack.append(node) # 스택에 삽입 - 같은 강한결합요소 체크를 위해
        parent =visited[node]
        for next in edges[node]:
            # 아직 방문하지 않았다면, dfs 수행 
            if visited[next] ==0: parent=min(parent, dfs(next))
            # 현재 dfs가 수행중인--> 부모일수도 아니면 형제일수도 
            elif not finished[next]: parent =min(parent,visited[next])
        
        # 부모 노드가 자기 자신인 경우
        if parent==visited[node]:
            scc=[]
            while True:
                t=stack.pop()
                scc.append(t)
                finished[t]=True
                if t==node: break
            scc=sorted(scc)
            SCC.append(scc)
    
        # 부모 출력
        return parent
    
    for i in range(1,v+1):
        if not visited[i]: dfs(i)
    SCC=sorted(SCC)
    print(len(SCC))
    for i in range(len(SCC)):
        print(*SCC[i],end=' -1\n')
       

    강한 결합요소 2-SAT

    충족 가능성 문제 여러개의 boolean 변수들로 이루어진 boolean expression 가 있을 때 각 변수의 값을 true false로 설정하여 전체 식의 결과를 true로 만들 수 있는지 판별하는 문제 ,

    • a v b 명제 일 때 ~a-> b, ~b ->a 인 것을 이용하여 이것을 그래프의 엣지로 만들어 강한 결합요소 묶음으로 만들어 묶음안에 a, ~a 등의 모순되는 것이 없으면 가능하다는 풀이

    // baek11280 2-SAT -3 
    #include <cstdio>
    #include <cstring>
    #include <vector>
    #include <stack>
    #include <utility>
    #include <algorithm>
    using namespace std;
    typedef pair<int,int> P;
    const int MAX = 10001;  // n변수 최대 값
    
    int N,M, cnt,scc,dfsn[MAX*2],sccidx[MAX*2];
    vector<int> edge[MAX*2];
    bool finished[MAX*2];
    stack<int> st;
    
    // 자신의 not literal의 정점 번호 리턴 +,- 전환
    inline int oppo(int n) {return n%2? n-1:n+1;}
    
    int findscc(int cur)
    {
       dfsn[cur] = ++cnt;
       int ret= dfsn[cur];
       st.push(cur);
    
       for(auto next : edge[cur])
       {
           if(dfsn[next] == 0) // 아직 방문 x
           {
               ret= min(ret,findscc(next));
           }
           else if(!finished[next]) // 
           {
               ret = min(ret,dfsn[next]);
           }
       }    
    
       if(ret >= dfsn[cur] && !finished[cur])
       {
           while(1)
           {
               int stop = st.top();
               st.pop();
               sccidx[stop] = scc;
               finished[stop] = true;
               if(stop == cur) break;
           }
           scc++;
       }
    
       return ret;
    }
    int main(){
        //input
        scanf("%d %d",&N,&M);
        for (int i =0; i<M;i++){
            int a,b;
            scanf("%d %d",&a,&b);
            a = (a<0? -(a+1)*2 : a*2-1);
            b = (b<0? -(b+1)*2 : b*2-1);
            edge[oppo(a)].push_back(b);
            edge[oppo(b)].push_back(a);        
        }
    
        // scc
        for (int i=0; i<N*2;i++){
            if (dfsn[i]==0) findscc(i);
        }
    
        for (int i =0;i<N;i++){
            if (sccidx[i*2]==sccidx[i*2+1]){    //불 가능
                puts("0");
                return 0;
            }
        }
    
        // 간응
        puts("1");
    
    
    }

    세그먼트 트리

    # baek11505 구간 곱 구하기
    import sys
    from math import *
    input=sys.stdin.readline
    
    # update
    def update(node, start, end, idx, val): # 세그먼트 트리 업데이트 함수
        if idx < start or end < idx: # 범위를 벗어났으면 종료
            return
    
        if start == end:  # 마지막 노드 
            tree[node] = val
            return
    
        mid = (start + end) // 2
        update(node*2,start,mid,idx,val) # 현재노드의 좌측 업데이트
        update(node*2+1,mid+1,end,idx,val) # 현재노드의 우측 업데이트
        tree[node] = (tree[node*2] * tree[node*2+1]) % 1000000007  # 좌측 노드* 우측노드
    
    # query
    def query(node, start, end, left, right): # 노드 곱 쿼리
        if right < start or end < left: # 없는 자리면, 곱셈의 항등원 1리턴
            return 1
    
        if left <= start and end <= right: # 노드의 아래가 모두 포함 되면 전체 포함
            return tree[node]
    
        mid = (start + end) // 2
        tmp = query(node*2,start,mid,left,right) * query(node*2+1,mid+1,end,left,right) # 좌측 우측 노드 곱 (포함 범위만)
        return tmp % 1000000007        # 나머지만 리턴
    
    # main
    n, m, k = [int(x) for x in input().split()]
    
    h = int(ceil(log2(n)))
    t_size = 1 << (h+1)
    
    arr = []
    tree = [0] * t_size
    
    for i in range(n):
        num = int(input())
        arr.append(num)
        update(1,0,n-1,i,num)
    
    for _ in range(m+k):
        a, b, c = [int(x) for x in input().split()]
    
        if a == 1:  # 노드 값 변경
            arr[b-1] = c
            update(1,0,n-1,b-1,c)
        elif a == 2: # 노드들 곱 쿼리
            print(query(1,0,n-1,b-1,c-1))

    Visit original content creator repository
    https://github.com/choyj0920/algorithm